Spring Boot에서 Repository로 DynamoDB 조작하기 (1) - 설정부터 실행까지
• 김명재

안녕하세요, 미래사업부문 김명재입니다. 작년 10월에 우아한형제들에 입사하고 행복한 주니어 개발자 생활을 하고 있습니다. 현재 개발중인 시스템의 NoSQL DB를 MongoDB에서 DynamoDB로 교체하면서 배운 것을 공유하려고 글을 쓰게 되었습니다.
이 글에서는 DynamoDB를 조작하는 다양한 방법들을 예제를 통해 소개합니다. aws cli -> curl -> AmazonDynamoDB 클래스 -> DynamoDBMapper 클래스 -> spring-data-dynamodb 순서로 진행하니, 쿼리 메서드만 궁금하신 분들은 spring-data-dynamodb로 쿼리 메서드 사용하기부터 보시면 됩니다.
목차
- DynamoDB를 써야 한다!
- DynamoDB를 써보자
DynamoDB를 써야 한다!
태초에 MongoDB로 구현한 API가 있었습니다. 아직 개발중인 시스템이지만 훗날 예견되는 운영상의 이유로 인해 MongoDB대신 DynamoDB를 사용하기로 했고, 해당 API의 창조자는 다른 일 때문에 바빴고, 공교롭게도 저는 진행하던 일의 막바지 작업을 하고 있었고, 디벨롭에 머지를 했고, DynamoDB를 공부할 좋은 기회가 주어졌습니다. 와!
spring-data-dynamodb라는 spring-data 라이브러리가 있었고 이를 활용한 예제들을 찾을 수 있었지만, DynamoDB SDK가 빠르게 업데이트되고 있던 시기라서 예제들이 정상적으로 작동하지 않았습니다. 영어로 된 정보들도 파편화되어있었고 한국어로 된 정보들은 더더욱 찾기 힘들었습니다. 하지만 저는 세계 최고 ORM 입문서를 공부했기 때문에 꼭 DynamoDB를 객체 매핑과 쿼리 메서드를 통해서 쓰고싶었습니다.
글을 쓰기 위해서 토이프로젝트를 진행했습니다. 포비 박재성님의 TDD 세미나에서 들은 내용으로 TDD를 강박적으로 적용했고, 김민태님의 React & TypeScript 101에서 공부한 것들로 UI도 구현했습니다.
간단한 방명록인데요, 기록(Mention)을 남길 수 있고 기록에 대한 댓글(Comment)도 남길 수 있습니다. 기록은 SQL DBMS(embedded h2)로, 댓글은 NoSQL DB(Dynamo DB)를 사용했습니다. 이 브랜치는 기록 API가 완성된 상태고, 댓글 API는 저장소(Repository) 레이어만 구현해서 DB와 연결해주기만 하면 작동합니다. 일단 기록 API와 웹앱만 실행해봅시다. 개발환경은 macOS 10.14, Java 1.8, node v10.12, Java에서 IntelliJ, TypeScript에서 VS Code를 사용했습니다.
git clone -b before-dynamodb --single-branch https://github.com/myeongjae-kim/guestbook.git

# guestbook/guestbook-api
./gradlew :guestbook-api-mentions:bootRun

# guestbook/guestbook-webapp
npm install; npm start;
댓글 저장소를 구현하기 전에 먼저 DynamoDB를 어떻게 쓰는지부터 알아봐야겠습니다.
DynamoDB를 써보자
Amazon DynamoDB는 어떤 규모에서도 10밀리초 미만의 성능을 제공하는 키-값 및 문서 데이터베이스입니다. DynamoDB는 하루에 10조 개 이상의 요청을 처리할 수 있고, 초당 2,000만 개 이상의 피크 요청을 지원할 수 있다고 하지만, 달 방명록에 그렇게 많은 사람이 기록을 남길 것 같진 않습니다. SQL DB와의 비교는 여기에서 볼 수 있습니다.
DynamoDB를 쿼리 메서드로 조작하기까지 거치는 레이어는 다음과 같습니다.
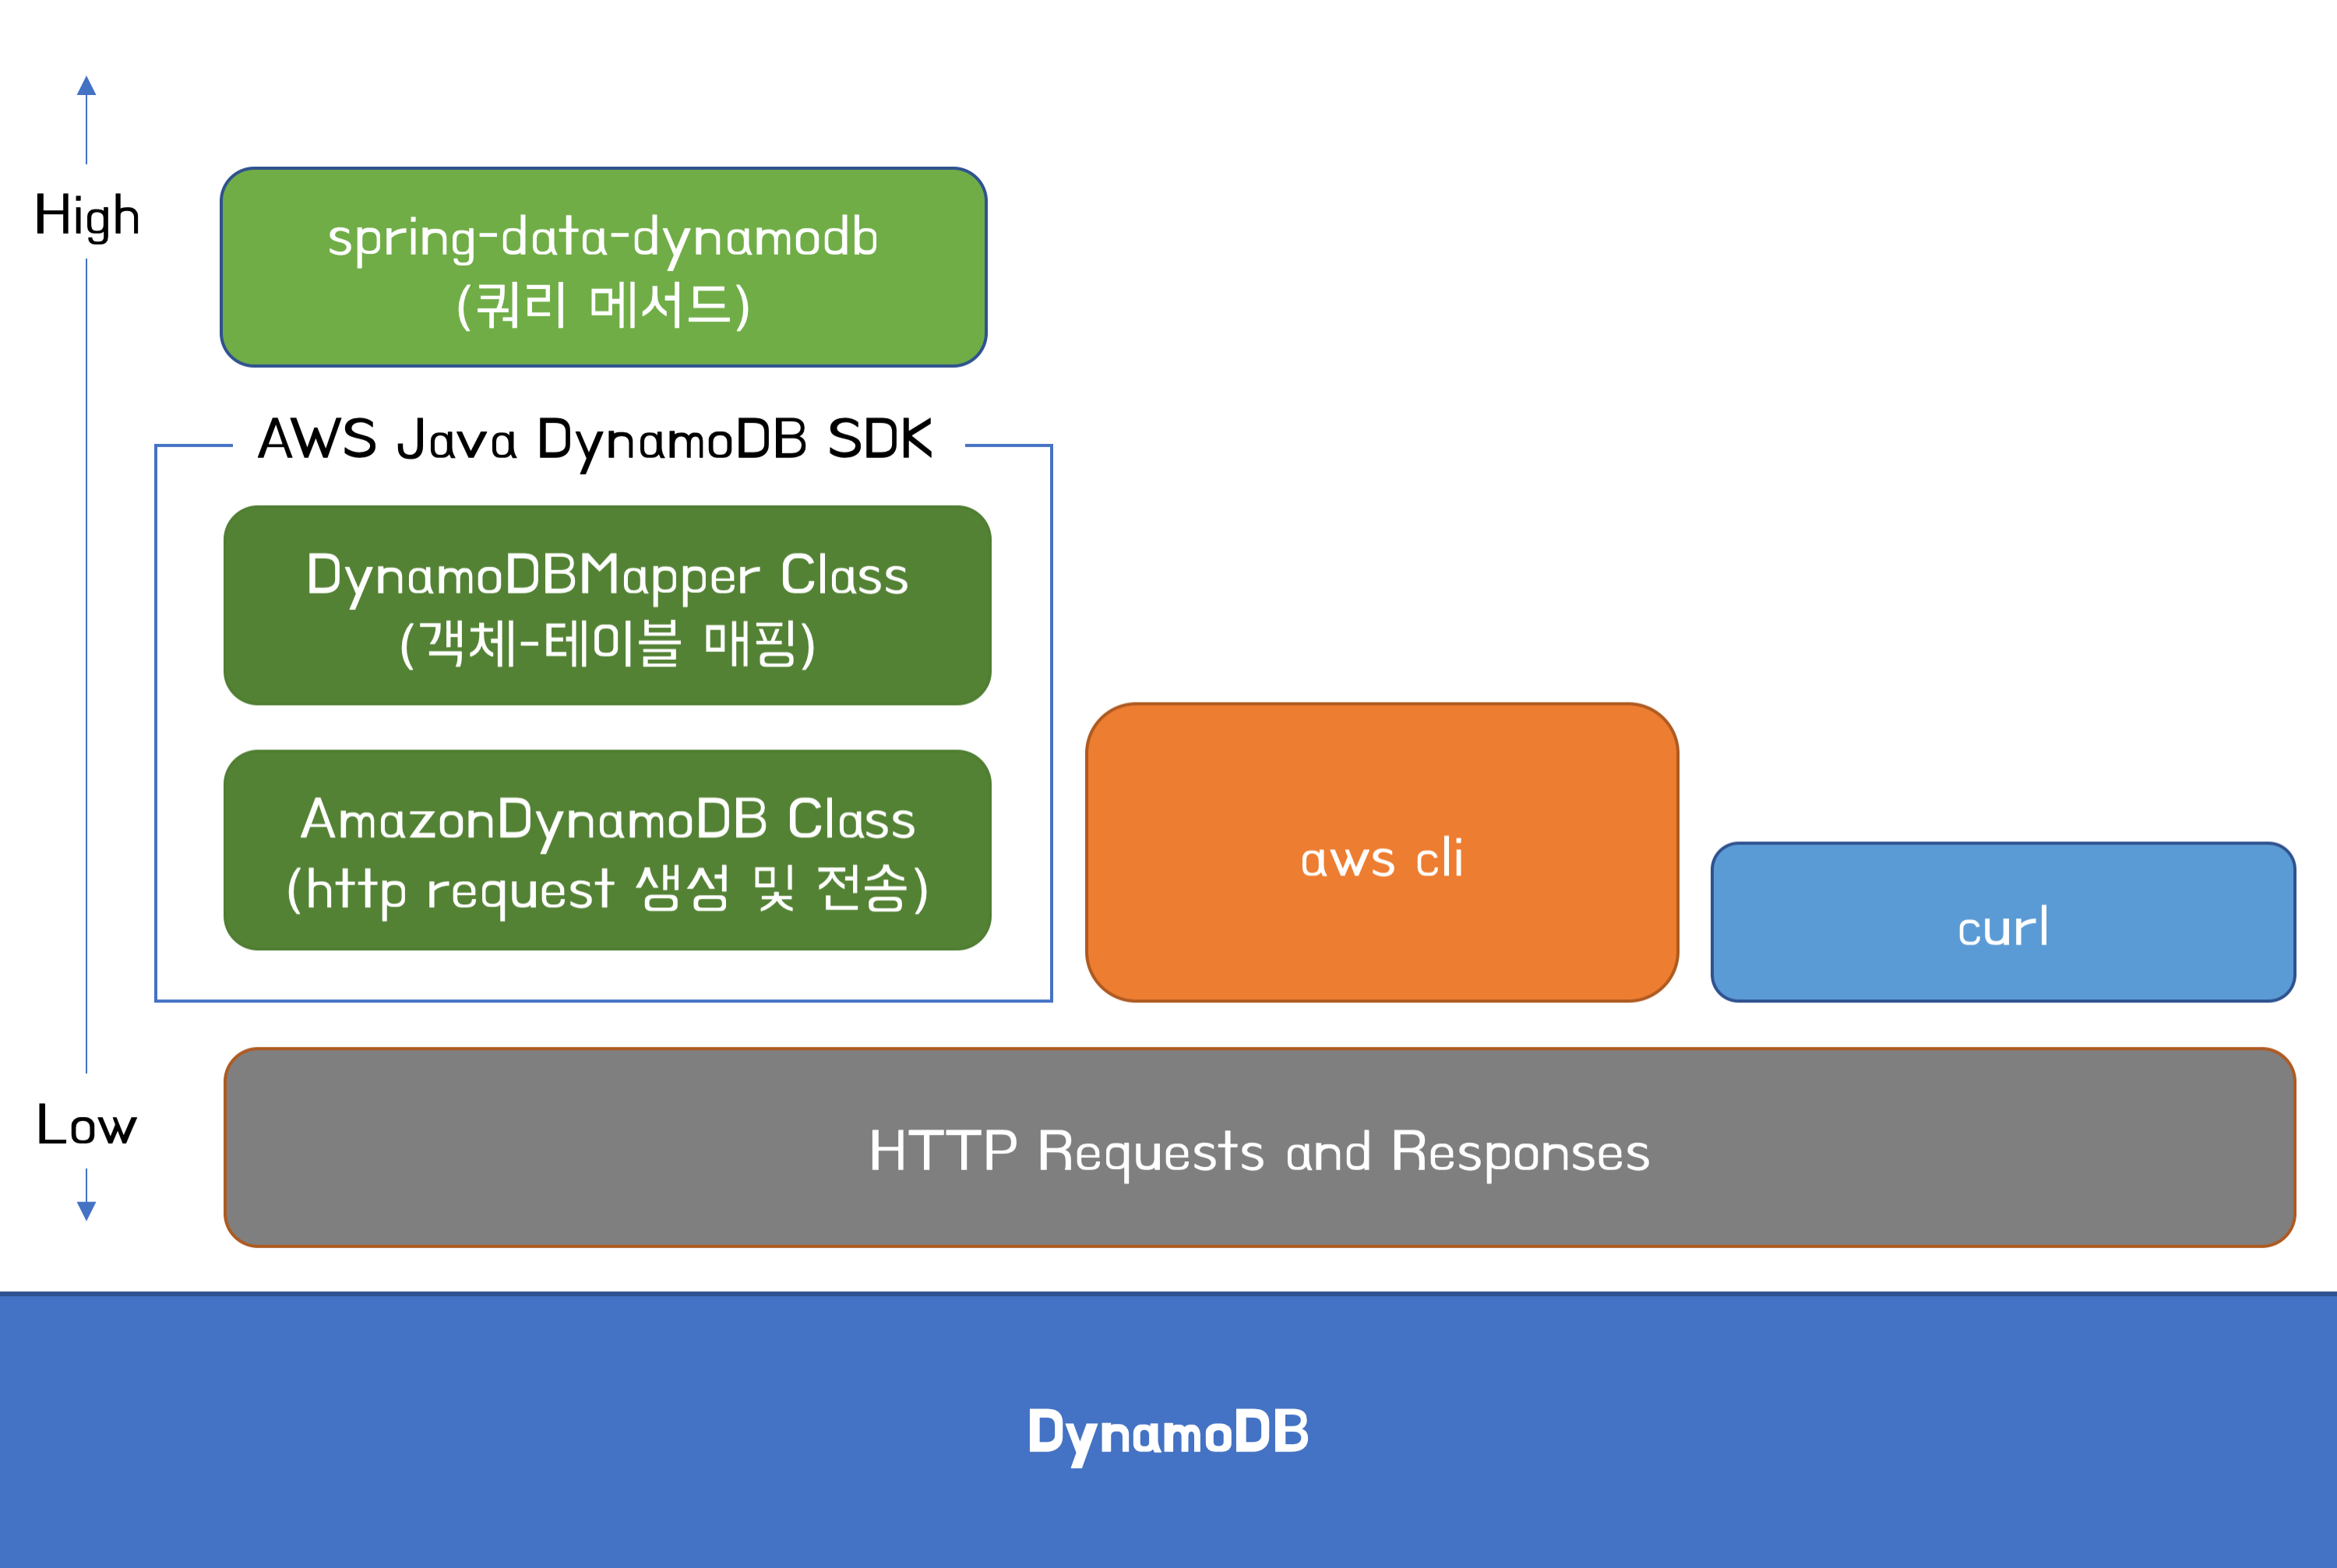
위에서 말씀드린 것처럼 aws cli -> curl -> AmazonDynamoDB 클래스 -> DynamoDBMapper 클래스 -> spring-data-dynamodb 순서로 진행합니다.
DynamoDB를 로컬에서 사용하기 위해서 aws cli와 DynamoDB 도커 이미지를 설치해야 합니다. 도커를 설치하고 다음과 같이 DynamoDB를 실행해봅시다.
#!/usr/bin/env bash

docker pull amazon/dynamodb-local
docker run -p 8000:8000 amazon/dynamodb-local -jar DynamoDBLocal.jar -inMemory -sharedDb
포트 8000번에 로컬 DynamoDB를 띄웁니다. -inMemory 옵션을 주면 DB를 종료할 때 DB의 모든 데이터가 사라지고, -sharedDb 옵션을 주면 request의 region이 다르더라도 같은 공간을 사용하게 됩니다.
aws cli로 DynamoDB 조작하기
테이블 생성
aws cli로 테이블을 생성해봅시다.
#!/usr/bin/env bash

aws dynamodb create-table \
    --endpoint-url http://localhost:8000 \
    --table-name Comment \
    --attribute-definitions \
        AttributeName=id,AttributeType=S \
        AttributeName=mentionId,AttributeType=N \
        AttributeName=createdAt,AttributeType=S \
    --key-schema AttributeName=id,KeyType=HASH \
    --provisioned-throughput ReadCapacityUnits=1,WriteCapacityUnits=1 \
    --global-secondary-indexes IndexName=byMentionId,\
KeySchema=["{\
  AttributeName=mentionId,\
  KeyType=HASH\
}","{\
  AttributeName=createdAt,\
  KeyType=RANGE\
}"],\
Projection="{ProjectionType=ALL}",\
ProvisionedThroughput="{\
  ReadCapacityUnits=1,\
  WriteCapacityUnits=1\
}"
생성이 잘 됐나요? 위 스키마는 댓글 클래스에 상응합니다.
public class Comment {
    private String id;
    private Integer mentionId;
    private String name;
    private String content;
    private boolean deleted;
    private LocalDateTime createdAt;
    private LocalDateTime deletedAt;
}
댓글의 필드는 7개인데, 위의 명령에서는 attirbute를 id, mentionId, createdAt 3개만 정의합니다. 마치 JavaScript의 JSON처럼 정의하지 않은 필드에 값을 넣어도 잘 들어갑니다… 동적 스키마는 NoSQL DB의 특징입니다. key에 대해서만 정의를 해주면 됩니다. 댓글은 3개의 key를 사용하는데, id는 primary Key, mentionId와 createdAt은 secondary index의 key입니다. Secondary index를 사용함으로써 임의의 기록에 달린 댓글을 시간순서대로 정렬해서 조회할 수 있습니다.
쿼리를 보면 테이블과 secondary index에 ProvisionedThroughput이 정의된 걸 볼 수 있습니다. ProvisionedThroughput에 대한 AWS의 설명은 다음과 같습니다.
프로비저닝된 모드
프로비저닝된 모드를 선택한 경우 애플리케이션에 필요한 초당 읽기 및 쓰기 횟수를 지정합니다. Auto Scaling을 사용하여 트래픽 변경에 따라 테이블의 프로비저닝된 용량을 자동으로 조정할 수 있습니다. 그러면 DynamoDB 사용을 정의된 요청 속도 이하로 유지하도록 관리하여 비용을 예측하는 데 도움이 됩니다.
프로비저닝된 모드는 다음 중 하나에 해당되는 경우에 유용한 옵션입니다.
- 애플리케이션 트래픽이 예측 가능한 경우
- 트래픽이 일관되거나 점진적으로 변화하는 애플리케이션을 실행할 경우
- 비용 관리를 위해 용량 요구 사항을 예측할 수 있는 경우
애플리케이션의 특성과 환경에 따라 ProvisionedThroughput을 조절해야 하지만, 로컬 DyanmoDB는 ProvisionedThroughput과 상관없이 작동하니 일단 1을 줍시다. 이렇게 Primary key와 secondary index에 대한 ProvisionedThroughput을 정의해야 테이블을 생성할 수 있습니다.
마지막으로 secondary index에 Projection="{ProjectionType=ALL}" 옵션을 줌으로써 secondary index를 통해 아이템을 조회할 때도 모든 필드를 출력하도록 합니다.
항목 추가
DynamoDB에서는 SQL DB의 레코드(혹은 row, 혹은 튜플)을 항목(item)이라고 부릅니다. 댓글 하나를 추가해봅시다.
#!/usr/bin/env bash

aws dynamodb put-item \
    --endpoint-url http://localhost:8000 \
    --table-name Comment \
    --item '{
        "id": {"S": "uuid"},
        "name": {"S": "name"},
        "mentionId": {"N": "1"},
        "content" : {"S": "comment content"},
        "deleted" : {"BOOL": false},
        "createdAt": {"S": "1836-03-07T02:21:30.536Z"}
    }'
항목 추가에 성공하면 0을 리턴합니다. 추가한 항목을 조회하는 명령은 다음과 같습니다.
항목 조회
#!/usr/bin/env bash

aws dynamodb get-item \
    --endpoint-url http://localhost:8000 \
    --table-name Comment \
    --key '{"id":{"S":"uuid"}}'
항목 수정
항목을 수정할 때는 추가할 때와 같은 명령을 사용합니다.
#!/usr/bin/env bash

aws dynamodb put-item \
    --endpoint-url http://localhost:8000 \
    --table-name Comment \
    --item '{
        "id": {"S": "uuid"},
        "name": {"S": "name"},
        "mentionId": {"N": "1"},
        "content" : {"S": "modified comment content"},
        "deleted" : {"BOOL": false},
        "createdAt": {"S": "1836-03-07T02:21:30.536Z"}
    }'
항목 삭제
#!/usr/bin/env bash

aws dynamodb delete-item \
    --endpoint-url http://localhost:8000 \
    --table-name Comment \
    --key '{"id":{"S":"uuid"}}'
테이블 삭제
#!/usr/bin/env bash

aws dynamodb delete-table \
    --endpoint-url http://localhost:8000 \
    --table-name Comment
aws cli에 의존하지 않고 DynamoDB를 조작할 수는 없을까요? 사실 aws cli를 사용하더라도 종국에는 DB와 통신하기 위해 http의 post method를 사용합니다. 이번에는 동치의 명령을 curl request로 날려봅시다.
curl로 DynamoDB 조작하기
테이블 생성
#!/usr/bin/env bash

curl -X POST \
  http://localhost:8000/ \
  -H 'Content-Type: application/json' \
  -H 'Authorization: AWS4-HMAC-SHA256 Credential=key1/20190526/ap-northeast-2' \
  -H 'X-Amz-Target: DynamoDB_20120810.CreateTable' \
  -d '{
    "AttributeDefinitions": [
        {
            "AttributeName": "id",
            "AttributeType": "S"
        },
        {
            "AttributeName": "mentionId",
            "AttributeType": "N"
        },
        {
            "AttributeName": "createdAt",
            "AttributeType": "S"
        }
    ],
    "TableName": "Comment",
    "KeySchema": [
        {
            "AttributeName": "id",
            "KeyType": "HASH"
        }
    ],
    "GlobalSecondaryIndexes": [
        {
            "IndexName": "byMentionId",
            "KeySchema": [
                {
                    "AttributeName": "mentionId",
                    "KeyType": "HASH"
                },
                {
                    "AttributeName": "createdAt",
                    "KeyType": "RANGE"
                }
            ],
            "Projection": {
                "ProjectionType": "ALL"
            },
            "ProvisionedThroughput": {
                "ReadCapacityUnits": 1,
                "WriteCapacityUnits": 1
            }
        }
    ],
    "ProvisionedThroughput": {
        "ReadCapacityUnits": 1,
        "WriteCapacityUnits": 1
    }
}'
Authorization header에서, Credential=key1/20190526/ap-northeast-2 에 / 2개로 구분한 임의의 값을 넣어도 로컬 DynamoDB는 동작합니다. Credential=a/b/c도 가능합니다.
항목 추가
#!/usr/bin/env bash

curl -X POST \
  http://localhost:8000/ \
  -H 'Authorization: AWS4-HMAC-SHA256 Credential=key1/20190526/ap-northeast-2' \
  -H 'Content-Type: application/json' \
  -H 'X-Amz-Target: DynamoDB_20120810.PutItem' \
  -d '{
	"TableName":"Comment",
	"Item":{
		"id": {"S": "uuid"},
		"mentionId": {"N": "1"},
		"content" : {"S": "comment content"},
		"deleted" : {"BOOL": "false"},
		"createdAt": {"S": "1836-03-07T02:21:30.536Z"}
	}
}'
항목 조회
#!/usr/bin/env bash

curl -X POST \
  http://localhost:8000/ \
  -H 'Authorization: AWS4-HMAC-SHA256 Credential=key1/20190526/ap-northeast-2' \
  -H 'Content-Type: application/json' \
  -H 'X-Amz-Target: DynamoDB_20120810.GetItem' \
  -d '{
    "TableName": "Comment",
    "Key": {
    	"id": {"S": "uuid"}
    }
}'
항목 수정
#!/usr/bin/env bash

curl -X POST \
  http://localhost:8000/ \
  -H 'Authorization: AWS4-HMAC-SHA256 Credential=key1/20190526/ap-northeast-2' \
  -H 'Content-Type: application/json' \
  -H 'X-Amz-Target: DynamoDB_20120810.PutItem' \
  -d '{
	"TableName":"Comment",
	"Item":{
		"id": {"S": "uuid"},
		"mentionId": {"N": "1"},
		"content" : {"S": "modified comment content"},
		"deleted" : {"BOOL": "false"},
		"createdAt": {"S": "1836-03-07T02:21:30.536Z"}
	}
}'
항목 삭제
#!/usr/bin/env bash

curl -X POST \
  http://localhost:8000/ \
  -H 'Authorization: AWS4-HMAC-SHA256 Credential=key1/20190526/ap-northeast-2' \
  -H 'Content-Type: application/json' \
  -H 'X-Amz-Target: DynamoDB_20120810.DeleteItem' \
  -d '{
	"TableName":"Comment",
	"Key":{
		"id": {"S": "uuid"}
	}
}'
테이블 삭제
#!/usr/bin/env bash

curl -X POST \
  http://localhost:8000/ \
  -H 'Authorization: AWS4-HMAC-SHA256 Credential=key1/20190526/ap-northeast-2' \
  -H 'Content-Type: application/json' \
  -H 'X-Amz-Target: DynamoDB_20120810.DeleteTable' \
  -d '{
	"TableName":"Comment"
}'
aws cli에 의존하지 않고 로컬 DynamoDB와 통신했습니다. aws cli를 사용할 수 없는 상황에서 유용하게 쓸 수 있겠습니다.
이번에는 Java DynamoDB SDK를 통해서 DynamoDB를 조작해봅시다.
Java DynamoDB SDK로 DynamoDB 조작하기
guestbook-api-comments/build.gradle의 dependencies에 implementation "com.amazonaws:aws-java-sdk-dynamodb:1.11.563"을 추가하고, guestbook-api-comments/src/test/java/guestbook/comments/AwsDynamoDbSdkTestToLearn.java 클래스를 추가합니다.
(이하의 테스트들은 JUnit5로 작성했습니다.)
class AwsDynamoDbSdkTestToLearn {
    private AmazonDynamoDB amazonDynamoDb;

    @BeforeEach
    void setup() {
        AWSCredentials awsCredentials = new BasicAWSCredentials("key1", "key2");
        AWSCredentialsProvider awsCredentialsProvider = new AWSStaticCredentialsProvider(awsCredentials);
        EndpointConfiguration endpointConfiguration = new EndpointConfiguration("http://localhost:8000", "ap-northeast-2");

        amazonDynamoDb = AmazonDynamoDBClientBuilder.standard()
                .withCredentials(awsCredentialsProvider)
                  .withEndpointConfiguration(endpointConfiguration).build();;
    }
}
매 테스트마다 DB Client객체를 생성하게 하고, 위에서 했던 것과 같은 작업을 해봅시다.
테이블 생성
@Test
@Disabled
void createTable_ValidInput_TableHasBeenCreated() {
    CreateTableRequest createTableRequest = (new CreateTableRequest())
            .withAttributeDefinitions(
                    new AttributeDefinition("id", ScalarAttributeType.S),
                    new AttributeDefinition("mentionId", ScalarAttributeType.N),
                    new AttributeDefinition("createdAt", ScalarAttributeType.S)
            ).withTableName("Comment").withKeySchema(
                    new KeySchemaElement("id", KeyType.HASH)
            ).withGlobalSecondaryIndexes(
                    (new GlobalSecondaryIndex())
                            .withIndexName("byMentionId")
                            .withKeySchema(
                                    new KeySchemaElement("mentionId", KeyType.HASH),
                                    new KeySchemaElement("createdAt", KeyType.RANGE))
                            .withProjection(
                                    (new Projection()).withProjectionType(ProjectionType.ALL))
                            .withProvisionedThroughput(new ProvisionedThroughput(1L, 1L))
            ).withProvisionedThroughput(
                    new ProvisionedThroughput(1L, 1L)
            );

    boolean hasTableBeenCreated = TableUtils.createTableIfNotExists(amazonDynamoDb, createTableRequest);
    then(hasTableBeenCreated).isTrue();
}
여기서 작성할 테스트들은 AWS SDK의 사용법을 익히기 위한 테스트들로 api를 위한 테스트가 아니기 때문에 @Diasbled를 붙였습니다. @Disabled를 붙이면 gradle을 통해 테스트를 진행할 때는 해당 테스트를 실행하지 않지만, IDE에서 개별 테스트를 수동으로 실행할 수 있습니다.
항목 추가
@Test
@Disabled
void putItem_ShouldBeCalledAfterTableCreation_StatusOk() {
    Map<String, AttributeValue> item = new HashMap<>();

    item.put("id", (new AttributeValue()).withS("uuid"));
    item.put("mentionId", (new AttributeValue()).withN("1"));
    item.put("content", (new AttributeValue()).withS("comment content"));
    item.put("deleted", (new AttributeValue()).withBOOL(false));
    item.put("createdAt", (new AttributeValue()).withS("1836-03-07T02:21:30.536Z"));

    PutItemRequest putItemRequest = (new PutItemRequest())
            .withTableName("Comment")
            .withItem(item);

    PutItemResult putItemResult = amazonDynamoDb.putItem(putItemRequest);
    then(putItemResult.getSdkHttpMetadata().getHttpStatusCode()).isEqualTo(200);
}
이 테스트는 DynamoDB에 Comment 테이블이 없는 상태로 실행하면 실패하기 때문에 테이블을 생성하는 테스트를 먼저 실행해야 합니다. 테스트들이 서로 의존하면 안되지만 이 테스트들은 테스트 슈트에 포함되지 않고 개별 테스트를 수동으로 실행해야 하므로, 테스트 이름에 시간적 의존성을 명시적으로 표시해서 정당화를 했습니다.
item맵 같은 경우 이후에 항목 조회에서도 쓰이므로 메서드 밖으로 변수를 옮겼습니다.
class AwsDynamoDbSdkTestToLearn {
  private AmazonDynamoDB amazonDynamoDb;
  private Map<String, AttributeValue> item;

  @BeforeEach
  void setup() {
      AWSCredentials awsCredentials = new BasicAWSCredentials("key1", "key2");
      AWSCredentialsProvider awsCredentialsProvider = new AWSStaticCredentialsProvider(awsCredentials);

      amazonDynamoDb = AmazonDynamoDBClientBuilder.standard()
              .withCredentials(awsCredentialsProvider)
              .withEndpointConfiguration(
                      new AwsClientBuilder.EndpointConfiguration("http://localhost:8000", "ap-northeast-2"))
              .build();

      item = new HashMap<>();
      item.put("id", (new AttributeValue()).withS("uuid"));
      item.put("mentionId", (new AttributeValue()).withN("1"));
      item.put("content", (new AttributeValue()).withS("comment content"));
      item.put("deleted", (new AttributeValue()).withBOOL(false));
      item.put("createdAt", (new AttributeValue()).withS("to be changed"));
      item.put("deletedAt", (new AttributeValue()).withS("to be changed"));
  }
...
항목 조회
@Test
@Disabled
void getItem_ShouldBeCalledAfterPuttingItem_FoundItem() {
    Map<String, AttributeValue> key = new HashMap<>();
    key.put("id", (new AttributeValue()).withS("uuid"));

    GetItemRequest getItemRequest = (new GetItemRequest())
            .withTableName("Comment")
            .withKey(key);

    GetItemResult getItemResult = amazonDynamoDb.getItem(getItemRequest);

    then(getItemResult.getItem()).containsAllEntriesOf(item);
}
항목 조회 테스트는 항목 생성 테스트 이후에 실행해야 통과합니다. 조회한 항목의 값들이 생성할 때 쓰인 항목의 값들과 같으면 테스트를 통과합니다.
항목 삭제
@Test
@Disabled
void deleteItem_ShouldBeCalledAfterPuttingItem_StatsOk() {
    Map<String, AttributeValue> key = new HashMap<>();
    key.put("id", (new AttributeValue()).withS("uuid"));

    DeleteItemRequest deleteItemRequest = (new DeleteItemRequest())
            .withTableName("Comment")
            .withKey(key);

    DeleteItemResult deleteItemResult = amazonDynamoDb.deleteItem(deleteItemRequest);

    then(deleteItemResult.getSdkHttpMetadata().getHttpStatusCode()).isEqualTo(200);
}
항목을 생성한 뒤 삭제 테스트를 실행하면 테스트가 통과합니다. 항목이 잘 삭제됐는지 확인하는 테스트는 다음과 같습니다.
@Test
@Disabled
void getItem_ShouldBeCalledAfterDeletingItem_NullItem() {
    Map<String, AttributeValue> key = new HashMap<>();
    key.put("id", (new AttributeValue()).withS("uuid"));

    GetItemRequest getItemRequest = (new GetItemRequest())
            .withTableName("Comment")
            .withKey(key);

    GetItemResult getItemResult = amazonDynamoDb.getItem(getItemRequest);

    then(getItemResult.getItem()).isNull();
}
DynamoDBMapper를 활용해 객체 매핑하기
DynamoDBMapper는 Java DynamoDB SDK에서 제공하는 객체-테이블 매핑 도구입니다. 이전과 마찬가지로, DynamoDBMapper를 익히기 위한 테스트를 작성하도록 하겠습니다. guestbook-api-comments/src/test/java/guestbook/comments/DynamoDbMapperTestToLearn.java 클래스를 추가합니다.
테이블 생성
class AwsDynamoDbMapperTestToLearn {
    private AmazonDynamoDB amazonDynamoDb;
    private DynamoDBMapper dynamoDbMapper;

    @BeforeEach
    void setup() {
        AWSCredentials awsCredentials = new BasicAWSCredentials("key1", "key2");
        AWSCredentialsProvider awsCredentialsProvider = new AWSStaticCredentialsProvider(awsCredentials);
        EndpointConfiguration endpointConfiguration = new EndpointConfiguration("http://localhost:8000", "ap-northeast-2");

        amazonDynamoDb = AmazonDynamoDBClientBuilder.standard()
                .withCredentials(awsCredentialsProvider)
                  .withEndpointConfiguration(endpointConfiguration).build();;

        dynamoDbMapper = new DynamoDBMapper(amazonDynamoDb, DynamoDBMapperConfig.DEFAULT);
    }

    @Test
    @Disabled
    void createTable_ValidInput_TableHasBeenCreated() {
        CreateTableRequest createTableRequest = dynamoDbMapper.generateCreateTableRequest(Comment.class)
                .withProvisionedThroughput(new ProvisionedThroughput(1L, 1L));

        createTableRequest.getGlobalSecondaryIndexes().forEach(
                idx -> idx
                        .withProvisionedThroughput(new ProvisionedThroughput(1L, 1L))
                        .withProjection(new Projection().withProjectionType("ALL"))
        );
        then(TableUtils.createTableIfNotExists(amazonDynamoDb, createTableRequest)).isTrue();
    }
}
AmazonDynamoDB객체를 통해서 테스트에 사용할 DynamoDBMapper객체를 생성합니다. 이 객체를 통해서 테이블 매핑을 할 수 있습니다. dynamoDbMapper.generateCreateTableRequest(Comment.class)는 이전에 정의한 Comment 클래스를 통해서 테이블 생성 쿼리를 만듭니다.
테스트를 실행하면 장렬히 실패하는데, DynamoDBMapper를 위해 엔티티에 적당한 애노테이션을 추가해야 하기 때문입니다.
Entity에 Annotaiton 추가하기
@Getter
@Setter // Setters are used in aws-dynamodb-sdk
@NoArgsConstructor
@DynamoDBTable(tableName = "Comment")
public class Comment {
    @DynamoDBHashKey(attributeName = "id")
    @DynamoDBAutoGeneratedKey
    private String id;

    @DynamoDBAttribute
    @DynamoDBIndexHashKey(globalSecondaryIndexName = "byMentionId")
    private Integer mentionId;

    @DynamoDBAttribute
    private String name;

    @DynamoDBAttribute
    private String content;

    @DynamoDBAttribute
    @DynamoDBTyped(DynamoDBAttributeType.BOOL)
    private boolean deleted;

    @DynamoDBAttribute
    @DynamoDBIndexRangeKey(globalSecondaryIndexName = "byMentionId")
    private LocalDateTime createdAt;

    @DynamoDBAttribute
    private LocalDateTime deletedAt;

  ...
}
@DynamoDBTable(tableName = "Comment"): 해당 클래스를 엔티티로 설정합니다.@DynamoDBHashKey(attributeName = "id"): 해당 필드를 HashKey로 설정합니다.@DynamoDBAutoGeneratedKey: 자동으로 Key를 생성합니다. UUID를 활용합니다.@DynamoDBAttribute: 해당 필드를 Attribute로 설정합니다.@DynamoDBTyped(DynamoDBAttributeType.BOOL): 해당 타입을 DynamoDB의BOOL타입으로 설정합니다.@DynamoDBIndexHashKey(globalSecondaryIndexName = "byMentionId"):byMentionId라는 이름의 global secondary index의 HashKey를 설정합니다.@DynamoDBIndexRangeKey(globalSecondaryIndexName = "byMentionId"):byMentionId라는 이름의 global secondary index의 RangeKey를 설정합니다.
이렇게 설정을 하고 다시 테이블을 생성하는 테스트를 실행하면 다시 한 번 장렬하게 실패합니다…
com.amazonaws.services.dynamodbv2.datamodeling.DynamoDBMappingException: Comment[createdAt] could not be mapped for type LocalDateTime
이는 Java DynamoDB SDK가 Java의 기본 Date타입만 허용하기 때문입니다. 하지만 저는 LocalDateTime을 사용하고 싶으니, guestbook-api-comments/src/main/java/guestbook/comments/config/DynamoDbConfig.java클래스를 만들고 이 클래스에 LocalDateType와 Date를 상호 변환할 수 있는 컨버터를 추가하려고 합니다. 훗날 DynamoDbConfig 클래스는 spring-data-dynamodb의 설정을 위해 쓰이게 됩니다.
public class DynamoDbConfig {
    public static class LocalDateTimeConverter implements DynamoDBTypeConverter<Date, LocalDateTime> {
        @Override
        public Date convert(LocalDateTime source) {
            return Date.from(source.toInstant(ZoneOffset.UTC));
        }

        @Override
        public LocalDateTime unconvert(Date source) {
            return source.toInstant().atZone(TimeZone.getDefault().toZoneId()).toLocalDateTime();
        }
    }
}
LocalDateTime은 컨버터를 통해 UTC시간의 Date로 변환되어 DynamoDB에 저장되고, 불려올 때는 시스템 시간대의 LocalDateTime객체로 변환됩니다. LocalDateTime대신 ZonedDateTime도 마찬가지의 방법으로 사용할 수 있습니다. 컨버터의 위치는 어디든 상관없기 때문에 컨버터가 많아지면 DynamoDbConfig 클래스 밖으로 빼도 괜찮겠습니다.
LocalDateTime 필드에 @DynamoDBTypeConverted 애노테이션으로 컨버터를 연결하면 테이블 생성 테스트를 통과할 수 있습니다.
// Comment.java
...
public class Comment {
    ...

    @DynamoDBAttribute
    @DynamoDBIndexRangeKey(globalSecondaryIndexName = "byMentionId")
    @DynamoDBTypeConverted(converter = LocalDateTimeConverter.class)
    private LocalDateTime createdAt;
    @DynamoDBAttribute
    @DynamoDBTypeConverted(converter = LocalDateTimeConverter.class)
    private LocalDateTime deletedAt;

    ...
항목 생성
@Test
@Disabled
void saveItem_ShouldBeCalledAfterTableCreation_IdIsNotNull() {
    Comment comment = Comment.builder()
                .name("name")
                .mentionId(1)
                .content("content").build();
    then(comment.getId()).isNull();

    dynamoDbMapper.save(comment);
    then(comment.getId()).isNotEmpty();
}
null이었던 id가 항목을 저장한 뒤에 어떤 문자열로 채워졌다는 것을 확인했습니다. Comment객체의 경우 이후의 테스트에서도 써야 하므로 테스트 밖으로 빼줬습니다.
@SpringBootTest(classes = {DynamoDbConfig.class})
class AwsDynamoDbMapperTestToLearn {
    private AmazonDynamoDB amazonDynamoDb;
    private DynamoDBMapper dynamoDbMapper;
    private Comment comment;

    @BeforeEach
    void setup() {
        AWSCredentials awsCredentials = new BasicAWSCredentials("key1", "key2");
        AWSCredentialsProvider awsCredentialsProvider = new AWSStaticCredentialsProvider(awsCredentials);
        EndpointConfiguration endpointConfiguration = new EndpointConfiguration("http://localhost:8000", "ap-northeast-2");

        amazonDynamoDb = AmazonDynamoDBClientBuilder.standard()
                .withCredentials(awsCredentialsProvider)
                  .withEndpointConfiguration(endpointConfiguration).build();;

        dynamoDbMapper = new DynamoDBMapper(amazonDynamoDb, DynamoDBMapperConfig.DEFAULT);

        comment = Comment.builder()
                .mentionId(1)
                .name("name")
                .content("content").build();
    }

    ...
항목 조회
@Test
@Disabled
void saveAndLoadItem_ShouldBeCalledAfterTableCreation_FoundItem() {
    then(comment.getId()).isNull();
    dynamoDbMapper.save(comment);
    then(comment.getId()).isNotEmpty();

    Comment foundComment = dynamoDbMapper.load(Comment.class, comment.getId());

    then(foundComment)
            .hasFieldOrPropertyWithValue("id", comment.getId());
}
id가 없던 comment객체를 DynamoDB에 저장해 생성한 id를 확인하고, 해당 id로 항목을 찾는 테스트입니다.
항목 수정
@Test
@Disabled
void saveAndUpdateItem_ShouldBeCalledAfterTableCreation_UpdatedItem() {
    // given
    then(comment.getId()).isNull();
    dynamoDbMapper.save(comment);
    final String commentId = comment.getId();

    then(commentId).isNotEmpty();
    then(comment).hasFieldOrPropertyWithValue("content", "content");

    // update and save content
    comment.update("modified content");
    dynamoDbMapper.save(comment);

    // then
    Comment foundComment = dynamoDbMapper.load(Comment.class, commentId);
    then(foundComment)
            .hasFieldOrPropertyWithValue("content", "modified content");
}
이전 테스트에서 항목 조회까지 성공했으므로, 이번엔 한걸음 더 가서 항목 수정까지 하는 테스트를 작성했습니다.
항목 삭제
@Test
@Disabled
void saveAndDeleteItem_ShouldBeCalledAfterTableCreation_SameScannedCounts() {
    then(comment.getId()).isNull();
    dynamoDbMapper.save(comment);
    final String commentId = comment.getId();
    then(comment.getId()).isNotEmpty();

    dynamoDbMapper.delete(comment);

    Comment comment = dynamoDbMapper.load(Comment.class, commentId);
    then(comment).isNull();
}
생성한 항목의 id를 확인하고, 해당 객체를 삭제한 뒤 삭제한 id의 객체를 조회했을 때 null을 리턴한다는 것을 확인했습니다.
테이블 삭제
@Test
@Disabled
void deleteTable_ShouldBeCalledAfterTableCreation_TableHasBeenCreated() {
    DeleteTableRequest deleteTableRequest = dynamoDbMapper.generateDeleteTableRequest(Comment.class);
    then(TableUtils.deleteTableIfExists(amazonDynamoDb, deleteTableRequest)).isTrue();
}
테이블을 생성할 때와 마찬가지로 Comment.class를 통해 쿼리를 생성해서 테이블을 삭제할 수 있습니다.
DynamoDBMapper는 JPA의 EntityManager와 비슷한 위치에 있습니다. spring-data-dynamodb의 Repository를 통해 DynamoDB를 조작하면 DynamoDBMapper를 직접 조작하지 않고도 여러 작업을 할 수 있습니다.
spring-data-dynamodb로 쿼리 메서드 사용하기
spring-data-dynamodb의 최신버전은 5.1.0입니다. 이 버전부터 Spring Boot 2.1을 지원하지만 문제가 있어 실제로는 spring-boot가 2.1.4부터 spirng-data-dynamodb 5.1.0을 사용할 수 있습니다.
spring-boot의 버전이 2.1.0 ~ 2.1.3이고, 2.1.4로 업그레이드를 할 수 없는 상황이라면 dynamoDB-DynamoDBMapper 빈을 직접 정의해 오버라이딩하는 방법으로 spring-data-dynamodb 5.1.0을 사용할 수 있습니다.
spring-boot 2.0대를 사용하고 있다면, spring-data-dynamodb 5.0.4를 사용하면 됩니다. spring-data-dynamodb의 버전에 따라 설정이 조금 다릅니다(5.0.4, 5.1.0). 5.1.0에서 설정이 조금 더 간단해졌습니다. 여기서는 spring-boot 2.1.4와 spring-data-dynamodb 5.1.0을 사용합니다.
guestbook-api-comments/build.gradle의 dependencies에 implementation "com.github.derjust:spring-data-dynamodb:5.1.0"를 추가하고, guestbook-api-comments/src/main/java/guestbook/comments/config/DynamoDbConfig.java에 다음과 같이 설정했습니다.
// spring-data-dynamodb 5.1.0
@Configuration
@EnableDynamoDBRepositories(basePackages = "guestbook.comments.domain")
public class DynamoDbConfig {
    @Value("${amazon.dynamodb.endpoint}")
    private String amazonDynamoDbEndpoint;

    @Value("${amazon.dynamodb.region}")
    private String amazonDynamoDbRegion;

    @Value("${amazon.aws.accesskey}")
    private String amazonAwsAccessKey;

    @Value("${amazon.aws.secretkey}")
    private String amazonAwsSecretKey;

    @Primary
    @Bean
    public DynamoDBMapper dynamoDbMapper(AmazonDynamoDB amazonDynamoDb) {
        return new DynamoDBMapper(amazonDynamoDb, DynamoDBMapperConfig.DEFAULT);
    }

    @Bean
    public DynamoDBMapper dynamoDBMapper(AmazonDynamoDB amazonDynamoDb, DynamoDBMapperConfig config) {
        return new DynamoDBMapper(amazonDynamoDb, config);
    }

    @Bean(name = "amazonDynamoDB")
    public AmazonDynamoDB amazonDynamoDb() {
        AWSStaticCredentialsProvider credentialsProvider = new AWSStaticCredentialsProvider(
                new BasicAWSCredentials(amazonAwsAccessKey, amazonAwsSecretKey));
        EndpointConfiguration endpointConfiguration =
                new EndpointConfiguration(amazonDynamoDbEndpoint, amazonDynamoDbRegion);

        return AmazonDynamoDBClientBuilder.standard()
                .withCredentials(credentialsProvider)
                .withEndpointConfiguration(endpointConfiguration).build();
    }

    // LocalDateTime Converter 생략
}
DynamoDbConfig클래스에 @Configuration과 @EnableDynamoDBRepositories를 달아주고 Bean들을 작성하면 됩니다. @Value 애노테이션에 필요한 값들은 guestbook-api-comments/src/main/resources/application.yml에 정의되어 있습니다.
amazon:
  dynamodb:
    endpoint: "http://localhost:8000"
    region: "ap-northeast-2"
  aws:
    accesskey: "key"
    secretkey: "key2"
@Primary가 달려있는 DynamoDBMapper Bean은 사실 spring-data-dynamodb 내부에서 dynamoDB-DynamoDBMapper라는 이름으로 알아서 생성해서 사용합니다. 하지만 CommentRepository만으로는 테이블을 생성하거나 삭제할 수 없기 때문에 @Primary를 붙여 재정의해 우리가 직접 DynamoDBMapper를 조작할 수 있도록 했습니다. 테이블 생성, 삭제를 하지 않아도 되면 DynamoDBMapper를 재정의하지 않아도 될테니 더 좋겠네요.
테이블 생성, 삭제 및 항목 추가
기존에 작성되어있던 CommentRepository 클래스는 DynamoDbConfig의 @EnableDynamoDBRepositories(basePackages = "guestbook.comments.domain") 덕분에 아무런 수정 없이도 DynamoDB의 Repository가 되었습니다. RepositoryTest를 작성해 테이블을 생성해봅시다.
guestbook-api-comments/src/test/java/guestbook/comments/domain/CommentRepositoryTest.java에 다음과 같이 작성합니다.
@SpringBootTest(classes = {DynamoDbConfig.class})
public class CommentRepositoryTest {
    private @Autowired CommentRepository commentRepository;
    private @Autowired AmazonDynamoDB amazonDynamoDb;
    private @Autowired DynamoDBMapper dynamoDbMapper;

    // TODO: It is weired to create and delete table for each test. Refactor it somehow...
    @BeforeEach
    void createTable() {
        CreateTableRequest createTableRequest = dynamoDbMapper.generateCreateTableRequest(Comment.class)
                .withProvisionedThroughput(new ProvisionedThroughput(1L, 1L));

        createTableRequest.getGlobalSecondaryIndexes().forEach(
                idx -> idx
                        .withProvisionedThroughput(new ProvisionedThroughput(1L, 1L))
                        .withProjection(new Projection().withProjectionType("ALL"))
        );
        TableUtils.createTableIfNotExists(amazonDynamoDb, createTableRequest);
    }

    @AfterEach
    void deleteTable() {
        DeleteTableRequest deleteTableRequest = dynamoDbMapper.generateDeleteTableRequest(Comment.class);
        TableUtils.deleteTableIfExists(amazonDynamoDb, deleteTableRequest);
    }

    @Test
    void createComment_ValidInput_CreatedComment() {
        Comment createdComment = commentRepository.save(Comment.builder()
                .mentionId(1)
                .name("name")
                .content("content").build());

        then(createdComment)
                .hasNoNullFieldsOrPropertiesExcept("deletedAt")
                .hasFieldOrPropertyWithValue("mentionId", 1)
                .hasFieldOrPropertyWithValue("name", "name")
                .hasFieldOrPropertyWithValue("content", "content");
    }
}
@SpringBootTest(classes = {DynamoDbConfig.class}) 애노테이션을 통해서 이전에 작성했던 Config의 Bean들을 추가합니다. 여기서부터 작성하는 테스트는 테스트 슈트에 포함될 테니 좀 더 신경써서 작성하려고 합니다. 하지만 DynamoDBMapper 테스트를 작성하면서 사용했던 테이블 생성 코드와 삭제 코드를 매 테스트의 시작과 끝에 실행하도록 했는데, 매 테스트마다 테이블을 생성하고 삭제하는 것은 바람직하지 않으니 미래의 자신이 리팩토링할 것이라 기대하면서 TODO로 기술부채를 쌓아줍시다.
항목 조회
@Test
void findCreatedComment_ById_FoundComment() {
    // given
    String id = commentRepository.save(Comment.builder()
            .mentionId(1)
            .name("name")
            .content("content").build()
    ).getId();

    // when
    Comment foundComment = commentRepository.findById(id)
            .orElseThrow(() -> new CommentNotFoundException(id));

    // then
    then(foundComment)
            .hasNoNullFieldsOrPropertiesExcept("deletedAt")
            .hasFieldOrPropertyWithValue("mentionId", 1)
            .hasFieldOrPropertyWithValue("name", "name")
            .hasFieldOrPropertyWithValue("content", "content");
}
항목을 저장해서 생성한 id로 조회를 합니다.
항목 수정
@Test
void updateComment_ValidInput_UpdatedComment() {
    // given
    String id = commentRepository.save(Comment.builder()
            .mentionId(1)
            .name("name")
            .content("content").build()
    ).getId();

    // when
    Comment foundComment = commentRepository.findById(id)
            .orElseThrow(() -> new CommentNotFoundException(id));
    foundComment.update("updated content");
    Comment modifiedComment = commentRepository.save(foundComment);

    // then
    then(modifiedComment)
            .hasNoNullFieldsOrPropertiesExcept("deletedAt")
            .hasFieldOrPropertyWithValue("mentionId", 1)
            .hasFieldOrPropertyWithValue("name", "name")
            .hasFieldOrPropertyWithValue("content", "updated content");
}
항목을 저장해서 생성한 id로 항목을 조회한 뒤 content를 수정하고 다시 저장을 합니다.
항목 삭제
@Test
void deleteCreatedComment_TryToFindDeletedComment_ThrowCommentNotFoundException() {
    // given
    Comment createdComment = commentRepository.save(Comment.builder()
            .mentionId(1)
            .name("name")
            .content("content").build());

    // when
    commentRepository.delete(createdComment);

    // then
    thenThrownBy(() -> commentRepository.findById(createdComment.getId())
            .orElseThrow(() -> new CommentNotFoundException(createdComment.getId())))
            .isExactlyInstanceOf(CommentNotFoundException.class);
}
삭제한 항목을 다시 조회하려고 할 때 CommentNotFoundException이 발생하는 것을 확인했습니다.
findAllByMentionIdOrderByCreatedAtAsc 테스트
드디어 쿼리 메서드까지 왔습니다. CommentRepository에 정의한 이 메서드를 사용함으로써 직접 쿼리를 작성하지 않고도 복잡한 명령을 DynamoDB에 내릴 수 있습니다. 쿼리 메서드에 대한 자세한 내용은 서두에 소개한 자바 ORM 표준 JPA 프로그래밍을 참조하시면 됩니다.
지금 테스트하려는 메서드는 같은 mentionId를 가진 댓글을 시간 순서대로 정렬해서 리턴합니다. Comment 클래스에 설정했던 global secondary index가 이때 DynamoDB 내부에서 쓰입니다.
@Test
void findComments_ByMentionIdAndOrderByCreatedAtDescDeletedFalse_FoundCommentsInDesignatedOrder() {
    // given
    int size = 10;
    IntStream.range(0, size).forEach(i -> commentRepository.save(Comment.builder()
            .mentionId(1)
            .name("name " + i)
            .content("content " + i).build()));

    // when
    List<Comment> foundComment = commentRepository
            .findAllByMentionIdOrderByCreatedAtAsc(1);

    // then
    then(foundComment.size()).isEqualTo(size);
    IntStream.range(1, size).forEach(i -> {
        Comment prev = foundComment.get(i - 1);
        Comment next = foundComment.get(i);
        then(prev.getCreatedAt().isBefore(next.getCreatedAt())).isTrue();
    });
}
Repository 테스트까지 추가했으니 통합 테스트로 모든 레어이가 제대로 작동하는지 확인해봅니다. 저는 guestbook-api-comments/src/integrationTest/java/guestbook/comments/api/CommentControllerIntTest.java에 테스트를 작성했습니다.
애플리케이션의 작동을 실제로 확인하진 않았어도 테스트를 통해서 프로그램이 제대로 돌아갈 것이라는 확신을 가질 수 있었습니다. 하지만 불-편…한 부분이, 서버를 실행할 때는 물론 테스트를 하기 위해서도 수동으로 DynamoDB를 실행해야 한다는 것입니다. 2부에서는 Gradle을 통해서 애플리케이션을 실행하거나 테스트를 할 때 DynamoDB를 자동으로 실행·종료해보도록 설정해보겠습니다.