아 엑셀다운로드 개발,,, 쉽고 빠르게 하고 싶다 (feat. 엑셀 다운로드 모듈 개발기)
• 최태현


1. 들어가며
안녕하세요! 정산시스템팀 병아리 개발자 최태현입니다.
최근에 엑셀 다운로드 개발을 편하게 할 수 있는 모듈을 만들게 되었습니다.
- 제가 엑셀 다운로드 모듈을 만들게 된 이유는 무엇인지
- 모듈을 만드는 과정에서 바뀌는 요구사항에 의해 코드가 어떻게 발전되었는지
- 이 모듈의 장단점은 무엇인지
하나하나 말씀드리겠습니다!
혹시 비슷한 불편을 겪고 계셨던 분들에게 작게라도 도움이 되었으면 좋겠습니다.
그럼 빠르게 시작~~ 하겠습니다!

2. 엑셀 개발을 쉽게 하고 싶었던 이유..
2.1 아주 많은 엑셀 다운로드
정산시스템은 배달의민족을 사용하시는 가게 사장님들의 받아야할 돈을 정산해주는 시스템입니다. (깨알 자랑을 하자면, 배달의민족은 사장님들 현금흐름에 조금이라도 도움이 되기 위해 업계 최초 일정산을 도입했습니다)
다양한 금액에 대한 대규모 데이터를 가지고 있다 보니 유관부서나 금융 관련 외부 기관에서 데이터 요청이 자주 들어오는 편입니다. 이런 요구사항을 반영하듯 정산시스템 내부 어드민에는 50개가 넘는 엑셀 다운로드 기능이 있었고, 계속해서 다양한 엑셀 다운로드 기능 개발이 필요했습니다.
또한 올해 초, 신규 시스템인 매입시스템을 개발하게 되었는데요. 이 시스템 역시 다양한 종류의 금액을 다루고 있어 많은 엑셀 다운로드 기능이 필요할 예정이었고, 현재와 같은 엑셀 개발 방법으로는 생산성이 다소 떨어진다고 판단하였습니다.
그리하여 엑셀 다운로드 기능 개발의 생산성을 올려줄 간단한 모듈을 만들어야겠다고 생각했는데요, 기존에는 엑셀 다운로드 개발 기능을 어떻게 구현하고 있었는지 가장 기본적인 형태부터 소개해보도록 하겠습니다. ^^
2.2 POI를 이용한 엑셀 다운로드 개발
2.2.1 가장 기본적인 형태의 엑셀 다운로드
자바를 이용해 엑셀 다운로드를 개발하게 되면, 흔히 POI 라이브러리를 사용하게 됩니다
POI 라이브러리를 사용한 가장 기본적인 엑셀 다운로드 구현을 살펴보면 아래 코드와 같습니다. Workbook, Sheet, Row, Cell, CellStyle에 대한 설명은 다른 포스팅에서 많이 다루고 있으니 생략하겠습니다. 코드 구조에 포커싱 해주세요!
@GetMapping("/api/v1/excel/car")
public void downloadCarInfo(HttpServletResponse response) throws IOException {
  // 엑셀 파일 하나를 만듭니다
  Workbook workbook = new SXSSFWorkbook();
  // 엑셀 파일 내부에 Sheet 를 하나 생성합니다 (엑셀 파일 하나에는 여러 Sheet가 있을 수 있습니다)
  Sheet sheet = workbook.createSheet();

  // 엑셀 렌더링에 필요한 DTO를 가져옵니다
  List<CarExcelDto> carExcelDtos = carService.getCarInfo();

  // 헤더를 생성합니다
  int rowIndex = 0;
  Row headerRow = sheet.createRow(rowIndex++);
  Cell headerCell1 = headerRow.createCell(0);
  headerCell1.setCellValue("회사");

  Cell headerCell2 = headerRow.createCell(1);
  headerCell2.setCellValue("차종");

  Cell headerCell3 = headerRow.createCell(2);
  headerCell3.setCellValue("가격");

  Cell headerCell4 = headerRow.createCell(2);
  headerCell3.setCellValue("평점");

  // 바디에 데이터를 넣어줍니다
  for (CarExcelDto dto : carExcelDtos) {
    Row bodyRow = sheet.createRow(rowIndex++);

    Cell bodyCell1 = bodyRow.createCell(0);
    bodyCell1.setCellValue(dto.getCompany());

    Cell bodyCell2 = bodyRow.createCell(1);
    bodyCell2.setCellValue(dto.getName());

    Cell bodyCell3 = bodyRow.createCell(2);
    bodyCell3.setCellValue(dto.getPrice());

    Cell bodyCell4 = bodyRow.createCell(3);
    bodyCell4.setCellValue(dto.getRating());
  }

  workbook.write(response.getOutputStream());
  workbook.close();
}
CarExcelDto는 이렇게 생겼습니다! 앞으로의 예제에서 계속 사용될 친구입니다!! (??? : 네, 역시 예제는 자동차죠)
@AllArgsConstructor
@Getter
public class CarExcelDto {
  private final String company; // 회사
  private final String name; // 차종
  private final int price; // 가격
  private final double rating; // 평점
}
엑셀 다운로드의 결과는 이렇습니다!
앞으로 엑셀 칼럼의 이름 있는 부분을 헤더! 값들이 있는 부분을 바디! 라고 부르겠습니다. (저는 자동차 하나도 모르는 무면허 입니다 ㅎㅎ 요즘 현대차 주가가 좋던데.. 크흐음.. 추천 아닙니다)
가장 기본적인 형태의 엑셀 다운로드 구현의 문제점은 아래와 같습니다.
- 헤더와 바디에 대해서 Cell 하나마다 값을 하나씩 지정해주어야 합니다. 값을 지정해주는 과정에서 실수를 할 여지도 많습니다. (평점이라는 글자를 headerCell3에 넣어주는 것 발견하셨나요?!! 하나 더 있습니다 히힛)
- 엑셀 결과물에 세로 한 줄을 추가로 그려야 할 때마다, 반복적인 코드가 들어가게 됩니다. 정산과 매입의 경우 대부분의 엑셀이 최소 10개 많으면 15개, 20개의 필드를 가지고 있습니다.
또한, 기본적인 형태 엑셀 다운로드에서 구현해야할 추가적인 요구사항도 있습니다.
- 헤더 구분을 용이하게 하기 위해 헤더별로 색깔을 다르게 넣어야 한다. 회사와 차종은 하늘색, 가격와 평점은 회색이다.
- 반환되는 모든 데이터는 중앙 정렬이어야 하고, Cell간의 구분을 용이하기 위해 Cell 사방에 테두리가 있어야 한다.
- Body의 Cell은 엑셀 다운로드 이후 처리를 원할하게 하기 위해서 <문자> 또는 <통화> 취급을 받아야 한다. 적절한 표시 형식을 가지고 있어야 한다.
2.2.2 스타일 요구사항을 반영한 엑셀 다운로드
우선 문제점 해결은 제쳐두고, 추가적인 요구사항을 엑셀 다운로드 코드에 구현해보면 아래와 같습니다. 위에서 나온 코드 중 일부는 생략되었습니다.
@GetMapping("/api/v1/car")
public void downloadCarInfo(HttpServletResponse response) throws IOException {
  // 데이터를 가져오고 Workbook, Sheet를 만듭니다
  CellStyle greyCellStyle = workbook.createCellStyle();
  applyCellStyle(greyCellStyle, new Color(231, 234, 236));

  CellStyle blueCellStyle = workbook.createCellStyle();
  applyCellStyle(blueCellStyle, new Color(223, 235, 246));

  CellStyle bodyCellStyle = workbook.createCellStyle();
  applyCellStyle(bodyCellStyle, new Color(255, 255, 255));

  // 헤더를 생성합니다
  int rowIndex = 0;
  Row headerRow = sheet.createRow(rowIndex++);
  Cell headerCell1 = headerRow.createCell(0);
  headerCell1.setCellValue("회사");
  headerCell1.setCellStyle(greyCellStyle); // style을 지정해주는 코드 추가

  /* 나머지 헤더 렌더링을 위한 반복 생략 */

  // 바디에 데이터를 넣어줍니다
  for (CarExcelDto dto : carExcelDtos) {
    Row bodyRow = sheet.createRow(rowIndex++);

    Cell bodyCell1 = bodyRow.createCell(0);
    bodyCell1.setCellValue(dto.getCompany());
    bodyCell1.setCellStyle(bodyCellStyle);

    /**
     * 나머지 바디 렌더링을 위한 반복 생략
     * int 타입과 double 타입에 대한 DataFormat 설정이 추가적으로 있습니다
     */
  }

  // OutputStream에 엑셀 sheet 데이터 쓰기
}

private void applyCellStyle(CellStyle cellStyle, Color color) {
  XSSFCellStyle xssfCellStyle = (XSSFCellStyle) cellStyle;
  xssfCellStyle.setFillForegroundColor(new XSSFColor(color, new DefaultIndexedColorMap()));
  cellStyle.setFillPattern(FillPatternType.SOLID_FOREGROUND);
  cellStyle.setAlignment(HorizontalAlignment.CENTER);
  cellStyle.setVerticalAlignment(VerticalAlignment.CENTER);
  cellStyle.setBorderLeft(BorderStyle.THIN);
  cellStyle.setBorderTop(BorderStyle.THIN);
  cellStyle.setBorderRight(BorderStyle.THIN);
  cellStyle.setBorderBottom(BorderStyle.THIN);
}
엑셀 자체는 예뻐졌지만 코드를 보면 아까 언급드렸던 구현의 문제점이 개선되기는 커녕 더 복잡해졌죠?? 새로운 엑셀 다운로드 기능을 구현할때마다 이런 코드가 반복된다고 생각하니 끔찍합니다… 으악…


2.2.3 일부 추상화가 된 엑셀 다운로드
당연히 정산시스템에서는 이런 코드를 사용하고 있지는 않습니다. 적절한 추상화로 Column Enum을 관리하고 렌더링 로직을 작성해주도록 되어 있죠. 간단한 예시를 보여드리면 아래와 같습니다.
/**
 * 렌더링 되어야 하는 DTO에 대응되는 ColumnInfo 예시입니다.
 * ExcelColumnInfo 인터페이스를 이용해 추상화되어 있습니다.
 *
 * ColumnType은 java.awt.Color만 가지고 있는 enum 입니다!
 */
@Getter
@RequiredArgsConstructor
public enum CarColumnInfo implements ExcelColumnInfo {

  COMPANY("회사", 0, 0, ColumnType.TEXT),
  NAME("차종", 0, 1, ColumnType.TEXT),
  PRICE("가격", 0, 2, ColumnType.NUMBER),
  RATING("평점", 0, 3, ColumnType.NUMBER);

  private final String text;
  private final int row;
  private final int column;
  private final ColumnType columnType;

  public static Map<Integer, List<CarColumnInfo>> getAllColumns() {
    return Arrays.stream(values())
            .collector(Collectors.groupingBy(ExcelColumnInfo::getRow));
  }
}

/**
 * AbstractXlsxStreamingView는 엑셀을 렌더링 하는데 필요한 기능들을 모아 추상화 시켜놓은 추상클래스입니다
 * 필요한 부분에 템플릿 메소드 패턴이 적용되어 있다고 생각해주시면 편합니다!
 */
public class CarExcelView extends AbstractXlsxStreamingView<CarExcelDto> {

  @Override
  protected void renderHeader(Workbook workbook, Sheet sheet) {
    for (Map.Entry<Integer, List<CarColumnInfo>> entry : CarColumnInfo.getAllColumns().entrySet()) {
      Row row = sheet.createRow(entry.getKey());
      for (CarColumnInfo columnInfo : entry.getValue()) {
        renderCell(row, columnInfo, columnInfo.getText(), createCellStyle(workbook, c.getColumnType()));
      }
    }
  }

  // renderBody에서 사용되는 cellStyle은 AbstractXlsxStreamingView 에서 '하나만' 만들어주고 있습니다
  @Override
  protected void renderBody(Row row, CarExcelDto dto, CellStyle cellStyle) {
    renderCell(row, COMPANY, dto.getCompany(), cellStyle);
    renderCell(row, NAME, dto.getName(), cellStyle);
    renderAmountCell(row, PRICE, dto.getPrice(), cellStyle);
    renderAmount(row, RATING, dto.getPrice(), cellStyle);
  }

}
CarExcelView에서 사용된 유틸성 코드들입니다. 실제로는 적절한 이름을 가진 private method로 코드가 나누어져 있습니다.
@NoArgsConstructor(access = AccessLevel.PRIVATE)
public ExcelRenders {

  public static createCellStyle(Workbook wb, ColumnType columnType) {
    XSSFCellStyle cellStyle = (XSSFCellStyle) wb.createCellStyle();

    // 배경색 지정
    cellStyle.setFillForegroundColor(color);
    cellStyle.setFillPattern(FillPatternType.SOLID_FOREGROUND);

    // 정렬
    cellStyle.setAlignment(HorizontalAlignment.CENTER);
    cellStyle.setVerticalAlignment(VerticalAlignment.CENTER);

    // 테두리
    cellStyle.setBorderTop(BorderStyle.THIN);
    cellStyle.setBorderBottom(BorderStyle.THIN);
    cellStyle.setBorderLeft(BorderStyle.THIN);
    cellStyle.setBorderRight(BorderStyle.THIN);
  }

  // renderAmountCell도 동일한 구조입니다!
  public static void renderCell(Row row, ExcelColumnInfo columnInfo, String value, CellStyle cellStyle) {
    Cell cell = row.createCell(columnInfo.getColumn());
    cell.setCellStyle(cellStyle);
    cell.setCellValue(value);
  }

}
하지만 정산에 적용되어 있는 엑셀 다운로드 코드를 새롭게 개발하는 매입시스템에 적용하기에는 여전히 아쉬운 점들이 있었습니다.
- 엑셀다운로드 기능을 구현할 때마다 ExcelColumnInfo 구현체를 만들어야 했습니다. 수십개의 엑셀 다운로드를 구현할때마다 구현체가 늘어나는 것도 번거롭고, Column이 많아질 수록 오타가 생길 수도 있죠.
- 엑셀 시트 렌더링 하는 곳에서 ExcelColumnInfo의 구현체와 렌더링하려는 DTO를 직접적으로 알고 있기 때문에 기능마다 ExcelView를 만들고 엑셀을 그려주는 코드를 직접 작성해야 했습니다. (rating을 렌더링 할때 price를 집어넣은 것을 눈치챈 당신은 대체…) 즉, 수십개의 ExcelColumnInfo와 ExcelView가 생겨야 했습니다.
- 스타일 적용이 되어 있긴 하지만, 같은 코드가 사용되고 Style에 관한 추상화가 되어 있지 않았습니다. 때문에 스타일을 Column 마다 다르게 적용하기에 어렵고, 새로운 Style 적용을 위해서는 모두가 공유하고 있는 코드를 바꾸거나 코드 중복이 일어났습니다.
저는 데이터를 반환하는 API와 크게 다르지 않은 형태로 엑셀 다운로드 기능을 만들 수 있길 원했습니다.
아래 코드 처럼요! (반환 객체 wrapping 등은 생락했습니다)
// 흔히 생각하는 API의 Controller 코드 Service 계층에서 나온 반환 객체를 돌려준다!
@GetMapping("/api/v1/car")
public List<CarDto> getCarInfo() {
  return carService.getCarInfo();
}

// Service 계층에서 나온 객체를 ExcelFile에 넣기만 하면 엑셀 다운로드 기능 완성!!
@GetMapping("/api/v2/excel/car")
public void downloadCarInfo(HttpServletResponse response) throws IOException {
  List<CarExcelDto> carExcelDtos = carService.getCarInfo();
  ExcelFile excelFile = new ExcelFile(carExcelDtos);
  excelFile.write(response.getOutputStream());
}
또한, 중복된 코드와 side-effect가 없는 cell 스타일을 Column마다 다르게 적용하고 싶었습니다. 실제로 매입시스템 엑셀 다운로드 요구사항에서는 Column마다 다른 스타일이 적용되었고 언제든지 바뀔 수 있었습니다.
2.3 세 줄 요약
- 팀의 특성상 엑셀 다운로드 기능이 많이 필요했으며, 많은 엑셀다운로드 기능을 포함한 신규 시스템을 빠른 시간 내에 구축해야 했다.
- 엑셀 다운로드에 가장 많이 사용되는 POI 모듈을 그냥 사용하면 일반 API를 개발하는 것보다 추가적인 공수가 많이 들고, 엑셀 다운로드 기능끼리 공통 코드를 공유하기가 어려웠다.
- 정산시스템에서 사용되고 있는 일부 추상화된 엑셀 모듈은 무언가 아쉬웠다.
3. 새로운 엑셀모듈 개발하기
자 그러면 본격적으로 새로운 엑셀 모듈을 개발해 보겠습니다.
3.1 어노테이션과 리플렉션을 이용하여 간편하게!
첫 번째 목표는 Column에 getter를 사용해 Cell을 하나씩 만들어줄 필요가 없도록 하는 것입니다. 이 목표를 위해 JAVA에 존재하는 어노테이션과 리플렉션을 활용할 수 있습니다 (커스텀 어노테이션의 다른 활용이 궁금하시다면 여기를 보시면 어떨까요?)
제가 구상한 방법은, JPA에서 DB column을 @Column으로 표시하는 것과 비슷하게 DTO에서 엑셀에 표시하고 싶은 필드를 @ExcelColum 으로 표시하는 방법입니다. headerName이라는 필드로 해당 필드의 헤더에 들어갈 이름을 정해줄 수 있고요!
@Target(ElementType.FIELD)
@Retention(RetentionPolicy.RUNTIME)
public @interface ExcelColumn {

  String headerName() default "";

}
짜잔! 간단하게 완성되었죠? 이제 이 어노테이션이 달린 DTO 객체를 받아 자동으로 엑셀을 그려줄 ExcelFile을 만들어 보겠습니다. POI Workbook의 구현체로는 SXSSFWorkbook을 선택했습니다!
public class SimpleExcelFile<T> {

  private static final SpreadsheetVersion supplyExcelVersion = SpreadsheetVersion.EXCEL2007;
  private static final int ROW_START_INDEX = 0;
  private static final int COLUMN_START_INDEX = 0;

  private SXSSFWorkbook wb;
  private Sheet sheet;
  private SimpleEcxelMetaData excelMetaData; // (1)

  public SimpleExcelFile(List<T> data, Class<T> type) {
    validateMaxRow(data);
    this.wb = new SXSSFWorkbook();
    this.excelMetaData = new SimpleExcelMetaData(type);
    renderExcel(data);
  }

  private void validateMaxRow(List<T> data) { // (2)
    int maxRows = supplyExcelVersion.getMaxRows();
    if (data.size() > maxRows) {
      throw new IllegalArgumentException(
              String.format("This concrete ExcelFile does not support over %s rows", maxRows));
    }
  }

  private void renderExcel(List<T> data) {
    // Create sheet and render headers
    sheet = wb.createSheet();
    renderHeadersWithNewSheet(sheet, ROW_START_INDEX, COLUMN_START_INDEX);

    if (data.isEmpty()) {
        return;
    }

    // Render Body
    int rowIndex = ROW_START_INDEX + 1;
    for (Object renderedData : data) {
      renderBody(renderedData, rowIndex++, COLUMN_START_INDEX);
    }
  }

  private void renderHeaders(Sheet sheet, int rowIndex, int columnStartIndex) {
    Row row = sheet.createRow(rowIndex);
    int columnIndex = columnStartIndex;
    for (String dataFieldName : excelResource.getDataFieldNames()) {
      Cell cell = row.createCell(columnIndex++);
      cell.setCellValue(excelResource.getExcelHeaderName(dataFieldName));
    }
  }

  private void renderBody(Object data, int rowIndex, int columnStartIndex) {
    Row row = sheet.createRow(rowIndex);
    int columnIndex = columnStartIndex;
    for (String dataFieldName : excelResource.getDataFieldNames()) {
      Cell cell = row.createCell(columnIndex++);
      try { // (3)
        Field field = getField(data.getClass(), (dataFieldName));
        field.setAccessible(true);
        renderCellValue(cell, field.get(data));
      } catch (Exception e) {
        throw new ExcelInternalException(e.getMessage(), e);
      }
    }
  }

  private void renderCellValue(Cell cell, Object cellValue) {
    if (cellValue instanceof Number) { // (4)
      Number numberValue = (Number) cellValue;
      cell.setCellValue(numberValue.doubleValue());
      return;
    }
    cell.setCellValue(cellValue == null ? "" : cellValue.toString());
  }

  public void write(OutputStream stream) throws IOException {
    wb.write(stream);
    wb.close();
    wb.dispose();
    stream.close();
  }

}
- SimpleExcelMetaData는 엑셀을 그릴때 필요한 일종의 메타데이터를 보관하는 객체입니다. 엑셀에 그려져야 하는 필드들의 이름(필드명)과 엑셀에 보여져야 하는 헤더 이름을 맵으로 관리하고 있죠.
- Excel 2007 이후부터 한 Sheet에 들어갈 수 있는 데이터의 최대 row 개수는 대략 100만개 입니다! 처음 만든 ExcelFile에서는 100만개 이하의 데이터만 엑셀에 그릴 수 있도록 설정했습니다. 아래서 여러 Sheet에 데이터를 렌더링할 수 있게 확장할 예정입니다.
- 리플렉션을 이용해 Excel 파일의 Body를 그리는 부분입니다. 리플렉션 과정에서 생길 수 있는 Exception을 RuntimeException으로 치환해주고 있습니다. ExcelMetaData로부터 확실히 검증된 필드만을 대상으로 리플렉션을 사용하기 때문에 실제 Exception이 일어날 수 없어 Exception 처리를 용이하기 위함입니다.
cell.setCellValue()를 사용할 때 타입이 어떻게 들어오냐에 따라 Cell에서 표시형식을 정하고 있습니다. setCellValue만으로 표시형식이 정해지는 것은 아니지만 setDataFormat과 복합적으로 사용되게 됩니다.
만들어진 SimpleExcelFile이 생각보다 간단하죠?? (오오오~)
이제 사용하는 측에서는 기존에 있던 CarExcelDto에 어노테이션을 추가해주고
public class CarExcelDto {
    @ExcelColumn(headerName = "회사")
    private final String company;

    @ExcelColumn(headerName = "차종")
    private final String name;

    @ExcelColumn(headerName = "가격")
    private final int price;

    @ExcelColumn(headerName = "평점")
    private final double rating;
}
Controller에 간단한 코드를 넣어주면 완성입니다!
@GetMapping("/api/v2/excel/car")
public void downloadCarInfo(HttpServletResponse response) throws IOException {
  List<CarExcelDto> carExcelDtos = carService.getCarInfo();
  SimpleExcelFile<CarExcelDto> excelFile = new SimpleExcelFile<>(carExcelDtos, CarExcelDto.class);
  excelFile.write(response.getOutputStream());
}
코드 자체에서 실수할 여지도 줄어들고 Controller 코드도 무척 간결해졌습니다!! ㅎㅎㅎ
하지만 아직 스타일이 적용되지는 않았죠! 엑셀의 헤더와 바디에 스타일을 적용할 수 있도록 엑셀 모듈을 개선해보겠습니다.
3.2 Cell 스타일을 커스텀하게 설정할 수 있게 하자
스타일을 커스텀하게 설정할 수 있게 하며 가장 먼저 고민했던 포인트는 어떻게하면 간결함을 유지할 수 있을까? 였습니다.
생각해보면, 엑셀에 스타일을 지정한다는 것은 크게 2가지 Step으로 나뉘어집니다.
- 어떤 스타일을 지정할지 정의한다 : 배경색의 색깔, Cell의 테두리, 정렬 등을 정의하는 단계입니다.
- 특정 스타일을 특정 Cell에 적용한다 : 1번에서 정의한 스타일을 엑셀에 그려지는 헤더 Cell이나 바디 Cell에 적용하는 단계입니다.
각 Step을 차례로 진행해보겠습니다.
3.2.1 스타일을 ‘정의’하기
제일 처음, 전략 패턴의 사용을 위해 ExcelCellStyle이라는 인터페이스를 만들었습니다.
이 인터페이스는 엑셀 모듈 사용자가 만들어둔 스타일을 의미합니다.
public interface ExcelCellStyle {

  void apply(CellStyle cellStyle);

}
이 인터페이스는 스타일을 cell에 적용시킬거라는 apply 메소드 하나만을 가지고 있습니다.
간단히 예를 들어 보면, 아래 BlueCellStyle 클래스는 배경색을 파랗게 만들어 줄 것입니다.
public class BlueCellStyle implements ExcelCellStyle {

  @Override
  public void apply(CellStyle cellStyle) {
    XSSFCellStyle xssfCellStyle = (XSSFCellStyle) cellStyle;
    xssfCellStyle.setFillForegroundColor(new XSSFColor(new Color(223, 235, 246), new DefaultIndexedColorMap()));
    xssfCellStyle.setFillPattern(FillPatternType.SOLID_FOREGROUND);
  }

}
BlueCellStyle 예시처럼 엑셀 모듈 사용자는 CellStyle에 직접 접근하게 됩니다. apache-poi의 CellStyle 사용법을 검색해서 알아내고 사용해야 하죠. 이 사실이 마음에 걸리는 몇몇 분들은 엑셀 모듈 자체에서 스타일 정의 방법을 추상화를 하고 싶으실 수 있습니다 ㅎㅎㅎ (네 바로 접니다)
예시로 배경색 지정 하나를 추상화 해보겠습니다 ㅎㅎㅎ
public interface ExcelBackgroundColor {

  void applyBackground(CellStyle cellStyle);

}
배경색을 적용할 수 있는 인터페이스를 하나 만들었습니다.
public class NoExcelBackgroundColor implements ExcelColor {
  @Override
  public void applyBackground(CellStyle cellStyle) {
    // Do nothign
  }
}
배경 지정을 하지 않는 구현체입니다.
public class RgbExcelBackgroundColor implements ExcelColor {

  private static final int MIN_RGB = 0;
  private static final int MAX_RGB = 255;

  private byte red;
  private byte green;
  private byte blue;

  public RgbExcelBackgroundColor(int red, int green, int blue) {
    if (red < MIN_RGB || red > MAX_RGB || green < MIN_RGB ||
          green > MAX_RGB || blue < MIN_RGB || blue > MAX_RGB) {
      throw new InvalidRgbException(String.format("Wrong RGB(%s %s %s)", red, green, blue));
    }
    this.red = (byte) red;
    this.green = (byte) green;
    this.blue = (byte) blue;
  }

  // Cell의 배경색을 지정하기 위해 사용하는 POI method는 setFillForegroundColor 입니다.
  @Override
  public void applyBackground(CellStyle cellStyle) {
    XSSFCellStyle xssfCellStyle = (XSSFCellStyle) cellStyle;
    xssfCellStyle.setFillForegroundColor(new XSSFColor(new byte[]{red, green, blue}, new DefaultIndexedColorMap()));
    cellStyle.setFillPattern(FillPatternType.SOLID_FOREGROUND);
  }

}
RGB 값을 입력 받아 배경색을 지정하는 구현체입니다.
이제 추상화된 배경색지정을 사용자가 쉽게 사용할 수 있도록 Spring Security 설정 방식을 참고하여 CustomExcelCellStyle과 ExcelCellStyleConfigurer를 만들었습니다!
public abstract class CustomExcelCellStyle implements ExcelCellStyle {

  private ExcelCellStyleConfigurer configurer = new ExcelCellStyleConfigurer();

  public CustomExcelCellStyle() {
    configure(configurer);
  }

  public abstract void configure(ExcelCellStyleConfigurer configurer);

  @Override
  public void apply(CellStyle cellStyle) {
    configurer.configure(cellStyle);
  }

}
public class ExcelCellStyleConfigurer {

  private ExcelBackgroundColor backgroundColor = new NoExcelBackgroundColor();

  public ExcelCellStyleConfigurer backgroundColor(int red, int blue, int green) {
    this.foregroundColor = new RgbExcelBackgroundColor(red, blue, green);
    return this;
  }

  public void configure(CellStyle cellStyle) {
    foregroundColor.applyBackground(cellStyle);
  }

}
사용자 입장에서는 CustomExcelCellStyle을 상속받아 ExcelCellStyle을 쉽게 만들 수 있습니다.
public class BlueHeaderStyle extends CustomExcelCellStyle {

  @Override
  public void configure(ExcelCellStyleConfigurer configurer) {
    configurer.backgroundColor(223, 235, 246);
  }

}
지금까지 만들고 사용된 객체간의 관계를 정리해보면 아래 그림과 같습니다!!

이런 추상화 방식은 배경색 외에도 글꼴, 글자 색, 가로-세로 정렬, 테두리 등으로 확장할 수 있습니다.
CellStyle을 정하는 사용자 입장에서는 직관적으로 스타일을 지정할 수 있게 되죠. (아래는 예시입니다!)
public class BlueHeaderStyle extends CustomExcelCellStyle {

  /**
   * 배경색이 (233, 235, 246)이고 네 방면 테두리가 얇게 존재하며,
   * 정가운데 정렬이라는 것을 쉽게 알 수 있습니다!
   */
  @Override
  public void configure(ExcelCellStyleConfigurer configurer) {
    configurer.backgroundColor(223, 235, 246)
        .allBorders(ExcelBorderStyle.THIN)
        .align(ExcelAlign.CENTER, ExcelAlign.CENTER);
  }

}
이제 스타일을 사용자가 마음대로 설정할 수 있으니 ExcelCell에 적용하는 부분을 만들어봅시다!
3.2.2 스타일을 ‘적용’하기
위에서 만들었던 ExcelCellSylte을 필드로 갖는 ExcelColumnStyle 어노테이션을 만들고
ExcelColumn이 헤더와 바디에 대한 Style을 받도록 해보겠습니다!
public @interface ExcelColumnStyle {

  Class<? extends ExcelCellStyle> excelCellStyleClass();

}
@Target(ElementType.FIELD)
@Retention(RetentionPolicy.RUNTIME)
public @interface ExcelColumn {

  String headerName() default "";
  ExcelColumnStyle headerStyle() default @ExcelColumnStyle(excelCellStyleClass = NoExcelCellStyle.class);
  ExcelColumnStyle bodyStyle() default @ExcelColumnStyle(excelCellStyleClass = NoExcelCellStyle.class);

}
좋습니다! 이제 headerName만 적용되어 있던 CarExcelDto에 스타일까지 지정해보겠습니다.
public class CarExcelDto {

  @ExcelColumn(
        headerName = "회사",
        headerStyle = @ExcelColumnStyle(excelCellStyleClass = GreyHeaderStyle.class),
        bodyStyle = @ExcelColumnStyle(excelCellStyleClass = BodyStyle.class)
  )
  private final String company;

  @ExcelColumn(
        headerName = "차종",
        headerStyle = @ExcelColumnStyle(excelCellStyleClass = GreyHeaderStyle.class),
        bodyStyle = @ExcelColumnStyle(excelCellStyleClass = BodyStyle.class)
  )
  private final String name;

  @ExcelColumn(
        headerName = "가격",
        headerStyle = @ExcelColumnStyle(excelCellStyleClass = BlueHeaderStyle.class),
        bodyStyle = @ExcelColumnStyle(excelCellStyleClass = BodyStyle.class)
  )
  private final int price;

  @ExcelColumn(
        headerName = "평점",
        headerStyle = @ExcelColumnStyle(excelCellStyleClass = BlueHeaderStyle.class),
        bodyStyle = @ExcelColumnStyle(excelCellStyleClass = BodyStyle.class)
  )
  private final double rating;

}
음.. 스타일을 지정할 수 있게 되었지만 필드마다 붙는 어노테이션이 너무 복잡해졌습니다…
이를 해결하기 위해서 클래스에 지정할 수 있는 어노테이션을 하나 더 만들겠습니다! 필드 어노테이션에 스타일이 지정되어 있지 않으면, 클래스에 지정되어 있는 스타일을 사용하는 방식이죠. 비슷하게 DefaultBodyStyle도 만들 수 있습니다.
/**
 * 어노테이션을 클래스에 붙일 수 있도록 ElementType.TYPE을 사용했습니다.
 * DefaulBodyStyle도 동일하게 만들 수 있습니다.
 */
@Target(ElementType.TYPE) // 클래스에 붙일 수 있는 TYPE 사용
@Retention(RetentionPolicy.RUNTIME)
public @interface DefaultHeaderStyle {

  ExcelColumnStyle style();

}
이제 CarExcelDto에 DefaultHeaderStyle, DefaultBodyStyle을 적용해보겠습니다.
@DefaultHeaderStyle(style = @ExcelColumnStyle(excelCellStyleClass = GreyHeaderStyle.class))
@DefaultBodyStyle(style = @ExcelColumnStyle(excelCellStyleClass = BodyStyle.class))
public class CarExcelDto {

  @ExcelColumn(headerName = "회사")
  private final String company;

  @ExcelColumn(headerName = "차종")
  private final String name;

  @ExcelColumn(
        headerName = "가격",
        headerStyle = @ExcelColumnStyle(excelCellStyleClass = BlueHeaderStyle.class)
  )
  private final int price;

  @ExcelColumn(
        headerName = "평점",
        headerStyle = @ExcelColumnStyle(excelCellStyleClass = BlueHeaderStyle.class)
  )
  private final double rating;

}
Header 색이 달라야 하는 필드에만 다른 Style을 지정할 수 있도록 되었습니다! 덕분에 봐줄만한 DTO가 되었네요! 필드 수가 많아질 수록 효과적으로 대응할 수 있을 것입니다.
여기까지면 좋겠지만, 물론 아직 끝나지 않았습니다 ㅎ…. SimpleExcelFile에서 어노테이션을 파싱하고 스타일을 입혀주는 코드를 추가해줘야 합니다.
3.2.3 스타일과~ 함께하는~ 엑셀~ 렌더링
어노테이션에 적용된 스타일을 데이터와 함께 렌더링 하기 전에, 기존에 사용하던 SimpleExcelMetaData를 살펴보겠습니다. 이 SimpleExcelMetaData는 두 가지 역할을 함께 가지고 있었습니다.
- 엑셀을 렌더링하는데 필요한 메타데이터를 보관하는 역할
- 렌더링 대상인 DTO의 어노테이션을 파악해 메타데이터를 정리하는 역할
이 중 두 번째 역할을 책임져줄 Factory 객체를 만들도록 하겠습니다.
public class SimpleExcelMetaDataFactory {

  private static SimpleExcelMetaDataFactory factory = new SimpleExcelMetaDataFactory();
  private SimpleExcelMetaDataFactory() {}
  public static SimpleExcelMetaDataFactory getInstance() {
    return factory;
  }

  public SimpleExcelMetaData createMetaData(Class<T> type) {
    Map<String, String> headerNamesMap = new LinkedHashMap<>();

    for (Field field : getAllFields(type)) {
      if (field.isAnnotationPresent(ExcelColumn.class)) {
        ExcelColumn columnAnnotation = field.getAnnotation(ExcelColumn.class);
        headerNamesMap.put(field.getName(), columnAnnotation.headerName());
      }
    }

    if (headerNamesMap.isEmpty()) {
      throw new NoExcelColumnAnnotationsException(String.format("Class %s has not @ExcelColumn at all", type));
    }

    return new SimpleExcelMetaData(headerNamesMap);
  }

}
Factory 객체가 DTO의 어노테이션을 파악해 메타데이터를 정리하는 역할을 가져감으로써 객체간의 역할과 책임이 분명해졌습니다! 또한, 팩토리 객체를 만듦으로써 동일한 DTO 객체에서 meta data를 엑셀 렌더링때마다 매번 추출하는게 아니라 최초 1회만 meta data를 추출하고 내부적으로 캐싱해두다가 필요할때 meta data를 반환할 수도 있게 되었습니다. (코드상 구현되지는 않았습니다 ^^;;)
이제 팩토리 객체에서 엑셀 DTO 클래스에 존재하는 클래스 레벨 ExcelColumnStyle, 필드 레벨 ExcelColumnStyle을 추출하여 SimpleExcelMetaData를 만들도록 변경하겠습니다.
/**
 * 기존에서 추가된 로직만 간단히 기술하였습니다!
 */
public SimpleExcelMetaData createMetaData(Class<T> type, Workbook wb) {
  PreCalculatedCellStyleMap styleMap = new PreCalculatedCellStyleMap(); // (1)

  ExcelColumnStyle classDefinedHeaderStyle = getHeaderExcelColumnStyle(type);
  ExcelColumnStyle classDefinedBodyStyle = getBodyExcelColumnStyle(type);

  for (Field field : getAllFields(type)) {
    if (field.isAnnotationPresent(ExcelColumn.class)) {
      ExcelColumn columnAnnotation = field.getAnnotation(ExcelColumn.class);
      styleMap.put(String.class, decideAppliedStyle(classDefinedHeaderStyle, columnAnnotation.headerStyle()),
            ExcelCellKey.of(field.getName(), HEADER), wb); // (2)
      styleMap.put(field.getType(), decideAppliedStyle(classDefinedHeaderStyle, columnAnnotation.bodyStyle()),
            ExcelCellKey.of(field.getName(), BODY), wb);
    }
  }
  ...
  return new SimpleExcelMetaData(styleMap, headerNamesMap);
}
- <(헤더/바디 여부, 필드명) → CellStyle>을 Map으로 가지고 있는 일급 컬렉션입니다. 유저가 직접 만들었던 ExcelCellStyle (예시 : BlueHeaderStyle) 을 이용해 CellStyle을 설정하고 이를 Map에 저장하고 있습니다.
- 클래스 레벨에 정의된 ExcelCellStyle과 필드 레벨에 정의된 ExcelCellStyle을 확인하여 적용되어야 하는 ExcelCellStyle 객체를 결정합니다. 리플렉션의
newInstnace()를 사용하고 있습니다.
이제 팩토리에서 만들어진 SimpleExcelMetaData 객체에는 엑셀에 데이터를 렌더링 할때 스타일을 어떻게 해야 할지, 헤더 이름은 어떻게 해야할지 들어있습니다. 마지막으로 이 정보를 이용하여 SimpleExcelFile도 간단히 수정해주겠습니다.
/**
 * SimpleExcelFile 클래스에서 추가된 로직만 기술하였습니다!
 */

private renderHeadersWithNewSheet(Sheet sheet, int rowIndex, int columnStartIndex) {
  ...
  for (...) {
    cell.setCellStyle(excelMetaData.getCellStyle(dataFieldName, ExcelRenderLocation.HEADER);
  }
}

private renderBody(Object data, int rowIndex, int columnStartIndex) {
  ...
  for (...) {
    try {
      cell.setCellStyle(excelMetaData.getCellStyle(dataFieldName, ExcelRenderLocation.BODY);
    }
  }
}
드디어 끝이 났습니다! 컨트롤러 코드는 변경할게 없죠 ㅎㅎㅎㅎ (오예~)
3.3 Type별 데이터 포맷
잠깐! 혹시 위의 엑셀에서 한 가지 부족한 것을 눈치채셨나요? 그것은 바로 Format 설정이 되지 않았다는 것입니다. (당연히 눈치채지 못하셨을겁니다 ㅎㅎㅎ 엑셀을 열어봐야 알 수 있으니까요!)

팀 내 다른 분들께서 엑셀을 다운로드 받아 금액 필드에 함수를 바로 적용하기 위해서 cell의 타입이 ‘통화’ 타입이어야 합니다.
Cell에 대한 format을 Annotation으로 지정하게 되면, DTO 객체에 어노테이션이 과도하게 생길 수 있는 현상이 다시 나타날 수 있으므로 위의 코드들에서 많이 사용했던 전략패턴을 다시 적용하겠습니다. (Strategy Pattern 정말 사랑합니다 ㅎ… 이름도 멋지지 않나요? 스트-렛지 닥터스트레인지 같습니다 ㅋㅋㅋㅋ)
public interface DataFormatDecider {

  String decideFormat(Class<?> type);

}
DataFormatDecider를 통해 필드 타입별로 데이터 포맷을 정할 수 있도록 하겠습니다. 보통 한 엑셀을 그릴때 같은 Type끼리는 데이터 포맷이 동일하기 때문입니다.
이 DataFormatDecider는 CellStyle을 만들때 사용될 것입니다
// PreCalculatedCellStyleMap 클래스
public void put(Class<?> type, ExcelCellStyle excelCellStyle, ExcelCellKey cellKey, Workbook wb) {
  CellStyle cellStyle = wb.createCellStyle();
  DataFormat dataFormat = wb.createDataFormat();
  cellStyle.setDataFormat(dataFormat.getFormat(dataFormatDecider.decideFormat(fieldType));
  excelCellStyle.apply(cellStyle);
  cellStyleMap.put(cellKey, cellStyle);
}
이제 SimpleExcelFile을 사용하는 입장에서 CustomDataFormatDecider를 사용해 타입을 지정할 수 있습니다!
// 조금 바뀐 Controller 코드
@GetMapping("/api/v2/excel/car")
public void downloadCarInfo(HttpServletResponse response) throws IOException {
  List<CarExcelDto> carExcelDtos = carService.getCarInfo();
  SimpleExcelFile<CarExcelDto> excelFile = new SimpleExcelFile<>(carExcelDtos, CarExcelDto.class, new CustomDataFormatDecider());
  excelFile.write(response.getOutputStream());
}

// Controller 클래스 내부에 작성했지만, 프로젝트 전체에서 공용하기 위해 별도 클래스 생성도 좋아요!
public static class CustomDataFormatDecider {
  @Override
  public String decideFormat(Class<?> type) {
    if (type.equals(Double.class) || type.equals(double.class)) {
      return "#,##0.00";
    }

    if (type.equals(Integer.class) || type.equals(int.class)) {
      return "#,##0";
    }

    return "";
  }
}
또한, 사용자가 DataFormatDecider의 구현체를 계속 넣어주는게 귀찮을 수 있으니 위의 CustomDataFormatDecider와 동일한 DefaultDataFormatDecider를 엑셀 모듈 내에 만들어 SimpleExcelFile에 기본값으로 넣어주겠습니다!
public class SimpleExcelFile<T> {

  public SimpleExcelFile(List<T> data, Class<T> type) {
    this(data, type, DefaultDataFormatDecider.getInstance());
  }

  public SimpleExcelFile(List<T> data, Class<T> type, DataFormatDecider dataFormatDecider) {
    validateMaxRow(data);
    this.wb = new SXSSFWorkbook();
    this.excelMetaData = SimpleExcelMetaDataFactory.getInstance().createMetaData(type, wb, dataFormatDecider);
    renderExcel(data);
  }

  // ...
}
이제 ‘통화’까지 적용되었습니다! 짜잔~ (비교하기 쉽게 금액을 네자리로 바꿨습니다!)
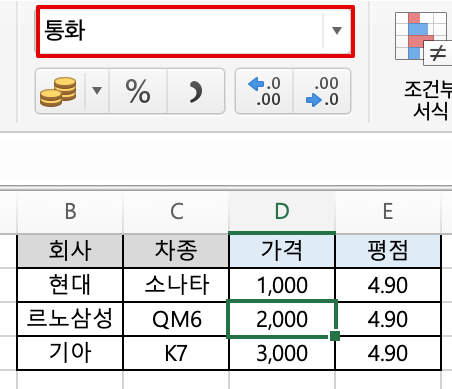
3.4 여러 종류의 ExcelFile이 필요하다!
만든 엑셀 모듈을 조금만 더 개선해보겠습니다! 현재는 약 100만 row까지만 출력할 수 있지만 더 많은 데이터를 출력해야 하는 엑셀이 필요할 수도 있습니다.
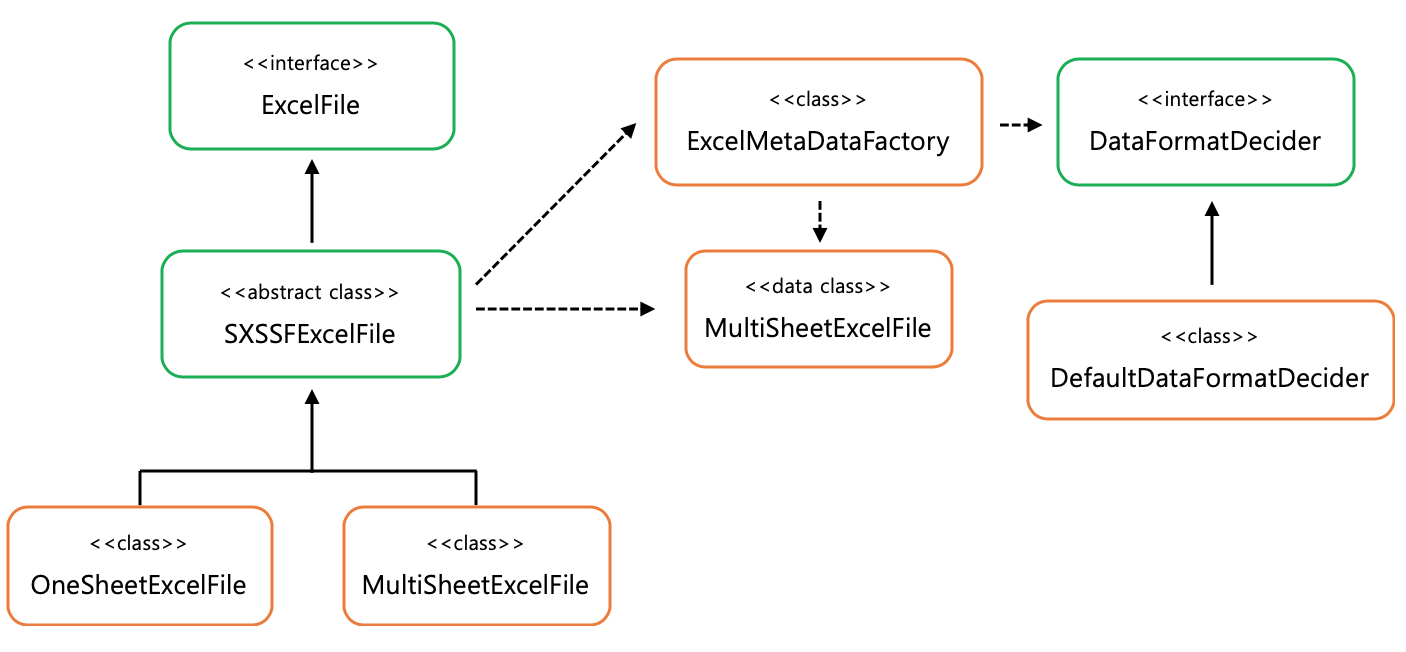
또한, 조금 더 생각해보면 계속해서 변형된 엑셀파일이 필요해질 수도 있을겁니다. 암호화를 해야 하는 엑셀, 정해진 템플릿을 이용하는 엑셀, 여백이 필요한 엑셀 등등… 따라서 100만 row 이상의 데이터를 출력할 수 있는 엑셀 파일을 만들기 전에 원래 만들었던 SimpleExcelFile을 추상화 시키도록 하겠습니다.
public abstract class SXSSFExcelFile<T> implements ExcelFile { // (1)

  protected static final SpreadsheetVersion supplyExcelVersion = SpreadsheetVersion.EXCEL2007;

  protected SXSSFWorkbook wb;
  protected Sheet sheet;
  private SimpleEcxelMetaData excelMetaData;

  public SimpleExcelFile(List<T> data, Class<T> type, DataFormatDecider dataFormatDecider) {
    validateMaxRow(data);
    this.wb = new SXSSFWorkbook();
    this.excelMetaData = SimpleExcelMetaDataFactory.getInstance().createMetaData(type, wb, dataFormatDecider);
    renderExcel(data);
  }

  protected void validateMaxRow(List<T> data) {}

  protected abstract void renderExcel(List<T> data); // (2)

  // (3)
  protected void renderHeaders(Sheet sheet, int rowIndex, int columnStartIndex) {
    Row row = sheet.createRow(rowIndex);
    int columnIndex = columnStartIndex;
    for (String dataFieldName : resource.getDataFieldNames()) {
      Cell cell = row.createCell(columnIndex++);
      cell.setCellStyle(resource.getCellStyle(dataFieldName, ExcelRenderLocation.HEADER));
      cell.setCellValue(resource.getExcelHeaderName(dataFieldName));
    }
  }

  protected void renderBody(Object data, int rowIndex, int columnStartIndex) {
    Row row = sheet.createRow(rowIndex);
    int columnIndex = columnStartIndex;
    for (String dataFieldName : resource.getDataFieldNames()) {
      Cell cell = row.createCell(columnIndex++);
      try {
        Field field = getField(data.getClass(), (dataFieldName));
        field.setAccessible(true);
        cell.setCellStyle(resource.getCellStyle(dataFieldName, ExcelRenderLocation.BODY));
        renderCellValue(cell, field.get(data));
      } catch (Exception e) {
        throw new ExcelInternalException(e.getMessage(), e);
      }
    }
  }

  private void renderCellValue(Cell cell, Object cellValue) {
    if (cellValue instanceof Number) {
      Number numberValue = (Number) cellValue;
      cell.setCellValue(numberValue.doubleValue());
      return;
    }
    cell.setCellValue(cellValue == null ? "" : cellValue.toString());
  }

  @Override
  public void write(OutputStream stream) throws IOException {
    wb.write(stream);
    wb.close();
    wb.dispose();
    stream.close();
  }

}
1) 엑셀 파일이 꼭 가져야할 인터페이스를 다음과 같이 정의했습니다. 주어진 stream에 엑셀 파일을 쓸 수 있어야 합니다.
public interface ExcelFile {

  void wirte(OutputStream stream) throws IOException;

}
2) 구현 클래스에서 사용할 훅 메소드입니다.
3) 하위 구현체들에서 자유롭게 사용할 수 있는 공통 메소드들입니다. 헤더를 그리거나 바디를 그리는데 활용할 수 있습니다.
이제 추상화된 SXSSFExcelFile을 상속받아 언제 새로운 Sheet를 만들지,
언제 어디에 헤더와 바디를 그릴지 결정해주는 부분을 하위 구현체에 넣어줄 수 있습니다!
아래는 각각 한 Sheet에만 데이터를 그릴 수 있는 엑셀 파일과 여러 Sheet에 데이터를 그릴 수 있는 엑셀 파일입니다.
public final class OneSheetExcelFile<T> extends SXSSFExcelFile<T> {

  // 클래스 필드 및 생성자 생략

  @Override
  public void renderExcel(List<T> data) {
    sheet = wb.createSheet();
    renderHeaders(sheet, ROW_START_INDEX, COLUMN_START_INDEX);

    if (data.isEmpty()) {
      return;
    }

    int rowIndex = ROW_START_INDEX + 1;
    for (Object renderedData : data) {
      renderBody(renderedData, rowIndex++, COLUMN_START_INDEX);
    }
  }

}
public final class MultiSheetExcelFile<T> extends SXSSFExcelFile<T> {

  // 클래스 필드 및 생성자 생략

  @Override
  protected void renderExcel(List<T> data) {
    createNewSheetWithHeader();

    if (data.isEmpty()) {
      return ;
    }

    int renderedDataCnt = 0;
    int rowIndex = ROW_START_INDEX + 1;
    for (Object renderedData : data) {
      renderBody(renderedData, rowIndex++, COLUMN_START_INDEX);
      renderedDataCnt++;

      if (renderedDataCnt == maxRowCanBeRendered) {
        renderedDataCnt = 0;
        rowIndex = 1;
        createNewSheetWithHeader();
      }
    }
  }

  private void createNewSheetWithHeader() {
    sheet = wb.createSheet();
    renderHeaders(sheet, ROW_START_INDEX, COLUMN_START_INDEX);
  }

}
아 혹시 OneSheetExcelFile과 MultiSheetExcelFile을 한 ExcelFile로 줄일 수 방법이 있지 않냐고요??

오호 개발 고수시군요 ㅎㅎㅎ 혹시… 이 사이트를 방문해 보는 것은 어떠신가요?? ^^;;
지금까지 언급된 엑셀 렌더링 담당 객체간의 관계를 그려보면 이렇습니다!
3.5 만들어진 모듈의 성능 분석 그리고 장단점
드디어 엑셀 모듈이 완성되었습니다.
기존보다 개발을 쉽고 빠르게 할 수 있는 엑셀 모듈! 실전에서 사용할 수 있을까요??
바~로 엑셀 렌더링 시간 및 성능을 jstat으로 측정해보았습니다 ㅎㅎ
# 0.2초마다 메모리 영역별 사용랑을 확인했습니다
jstat -gc pid 200 > jstat.log
적은 양의 데이터
- 1,000개의 cell 렌더링 기준 (10 필드, 100건)
- Xms Xmx 설정 없음
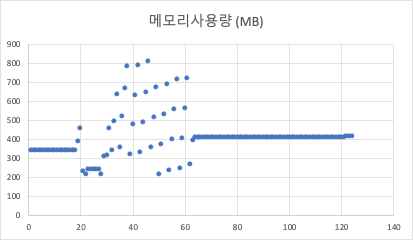
[차트1]은 getter를 이용한 기존의 엑셀 모듈 Heap영역 메모리 변화입니다
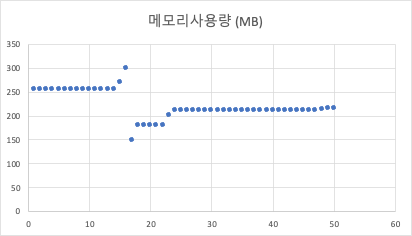
Application이 가동되었을때 250MB의 메모리를 차지하고 있었고 엑셀 다운로드시 최대 310MB의 메모리까지 차오른 것을 확인할 수 있었습니다.
엑셀 렌더링 및 stream write 시간은 1.657초가 소요되었습니다!
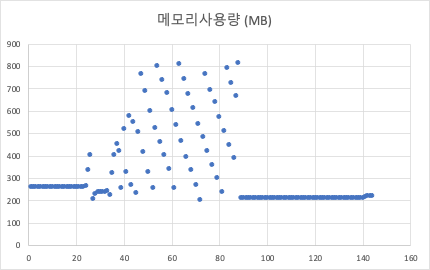
[차트2]은 annotation과 reflection을 이용한 새로운 엑셀 모듈 Heap영역 메모리 변화입니다
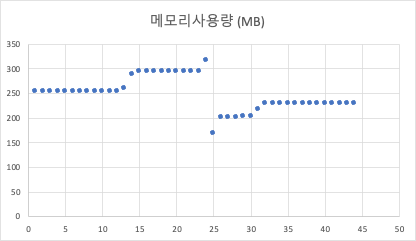
마찬가지로 Application이 가동되었을대 250MB의 메모리를 차지하고 있었고 엑셀 다운로드시 최대 330MB의 메모리까지 차오른 것을 확인할 수 있었습니다.
엑셀 렌더링 및 stream write 시간은 1.683초가 소요되었습니다!
많은 양의 데이터
- 10,000,000개의 cell 렌더링을 기준 (10개 필드, 100만건)
- Xms 1GB Xmx 2GB
[차트3]은 getter를 이용한 기존의 엑셀 모듈 힙사이즈 메모리 변화입니다.
힙사이즈는 최대 810MB까지 올라갔고, 엑셀 렌더링 및 stream write 시간은 16.429초가 소요되었습니다!
[차트4]는 annotation과 reflection을 이용한 새로운 엑셀 모듈 힙사이즈 메모리 변화입니다.
힙사이즈는 최대 810MB까지 올라갔고, 엑셀 렌더링 및 stream write 시간은 19.804초가 소요되었습니다!
테스트 결과를 종합해보면 새로운 엑셀 모듈의 장/단점을 확인할 수 있습니다!
장점
- API를 구현하는 것과 크게 다르지 않으며, 개발 속도가 빠르다.
- 스타일을 Column마다 Custom 하게 적용시킬 수 있다.
- 모듈 사용자 입장에서 관리해야할 객체가 줄어들고 중복된 코드가 발생하지 않는다.
단점
- 엑셀 파일 생성이 조금 더 느리다. 쿼리 10초에 렌더링 3초가 걸리는 13초 엑셀다운로드 기능이 있다면, 쿼리 10초에 렌더링 3.6초가 걸리는 13.6초 엑셀다운로드 기능으로 변하게 된다.
- 리플렉션 객체 생성/소멸로 인해 GC가 활발히 일어난다.
- 렌더링 데이터 양에 따라 다르지만, 리플렉션 객체가 지속적으로 필요하므로 필요로 하는 전체 힙사이즈가 조금 더 클 것이다.
따라서 엑셀 모듈 사용을 위해서는 적절한 최소 힙사이즈 / 최대 힙사이즈 조정이 필요하며 모듈 사용 여부는 데이터 크기, 개발 일정에 따라 적절한 선택이 필요한 것을 확인할 수 있습니다 😉
실제로 많은 엑셀 다운로드 개발 요청이 들어오고, 데이터가 상대적으로 적어 빠르게 개발해야 하는 건은 새로 만든 모듈을 적용하고 있고, 데이터가 많아 성능을 중시해야 하는 경우는 getter 방식을 사용하고 있습니다.
또한, 메모리의 peek가 문제될 수 있는 경우는 쿼리의 결과를 한 번에 ExcelFile로 집어 넣지 않고, 조금씩 나누어 넣는 방법을 신규 모듈과 getter 방식 모두 적용하고 있습니다. (아래 코드는 예시입니다!!)
@GetMapping("/api/v3/excel/car")
public void downloadCarInfo(HttpServletResponse response) throws IOException {
  ExcelFile<CarExcelDto> excelFile = new OneSheetExcelFile<>(CarExcelDto.class);
  for (int condition = 0; condition < end; condition++) {
    // 최대 List 크기를 줄이기 위해 반환 결과를 쪼개어 Excel에 넣어준다
    excelFile.addRows(carService.getCarInfo(condition)); // Offset or NoOffset Paging query
  }
  excelFile.write(response.getOutputStream());
}
3.7 세 줄 요약
- Annotation과 Reflection을 이용하여 Excel을 렌더링 할 수 있도록 엑셀 모듈을 구성하였다.
- 여러 요구사항을 충족시키기 위해 전략패턴과 템플릿 매소드 패턴이 적극적으로 활용되었다.
- getter를 이용한 엑셀 렌더링 방식과 비교해 보았을때 빠르고 편리한 개발, 깔끔한 코드가 장점이고 상대적으로 느린 속도와 많은 메모리 사용량이 단점이다.
4. 소고
드디어 긴 글이 끝났습니다!!! 우와아~~~ 모듈 개발은 하루 걸렸지만 글쓰는데 두 달이 걸린 기적…
정말정말 긴 글 읽어주셔서 감사합니다 :
이런 글에 또 소고가 빠질 수 없겠죠

최적화에 관하여
엑셀 모듈 개발의 모티브는 ‘엑셀 다운로드 기능을 빠르고 편리하게 개발하자’였습니다. 실제로 기존의 엑셀 구현 방식보다는 개선된 모습을 보여주었죠. 하지만 좋은 점이 있으면, 아쉬운 점이 있는 법. 새로 만든 모듈은 엑셀 파일 생성 시간이 조금 더 걸리고 메모리를 조금 더 많이 사용하는 모습을 보여줬습니다.
그렇다면 이 엑셀 모듈은 불필요 할까요?? 저는 그렇지 않다고 생각합니다!
많은 수의 일반 유저가 동시에 엑셀을 다운로드 받아야 하거나 대용량의 데이터를 빠른 시간 내에 처리하는 경우라면 클라이언트 엑셀 렌더링과 같은 아예 다른 방법을 써야 겠지만, 내부에서 사용하는 어드민이나 통계성 자료를 추출하는데는 적극적으로 활용될 수 있을겁니다. 어드민에 통계 자료가 많고 엑셀 기능이 수십개 있는 저희팀에 알맞은 조건이죠.
제가 정말 존경하는 한 분은 예전에 이런 글을 남겨주셨습니다.
시스템 최적화의 기본 원칙이 있다
Common Case를 단순하고 빠르게 만들고
Uncommon Case는 복잡하고 느려도 된다는 것
비슷하게, 치열한 비즈니스 전쟁터에서는 한정된 개발 리소스를 더 투입해야 할 곳과 덜 투입해야 할 곳을 구분할 수 있어야 한다고 생각합니다.
서비스 이용자가 자주 쓰는 기능은 시간이 오래 걸리더라도 리스스를 많이 투입하여 퍼포먼스를 높이고, 내부 구성원이 가끔 사용하는 기능은 리소스를 상대적으로 적게 투입해서 다른 핵심 기능에 대한 리소스를 아끼는 것이죠. 물론 그 후, 필요한 부분은 여유가 될때 점진적으로 개선해나가야 할 것입니다.
한 명의 개발자가 자라는데 온 개발자 동네가 필요하더라…
우아한형제들에 합류하게된지 벌써 1년이 훌쩍 넘었습니다.
1년 동안 팀의 주요 도메인인 정산과 지급에 대해 새로운 비즈니스 요구사항을 반영하기도 하고, 팀이 운영하는 시스템 전체에 로깅 인프라와 모니터링 환경을 구축하고, 그 과정과 가이드를 적어 위키에 공유하기도 했습니다. 이번 신규시스템을 새로 구축하는데 작은 보탬이 되기도 했고요.
이처럼 작년의 저와 비교해 성장할 수 있었던 이유는 제가 노력해서만은 아니라 생각합니다.
부끄러운 질문들에 대해 귀찮아하지 않고 꼼꼼하게 답변해주시는 사내 개발자 선배님들, 그리고 궁금증이나 어려운 점을 자유롭게 물어볼 수 있는 분위기 덕분입니다.


아직도 배워야 할 것은 산더미이고, 앞으로도 계속 늘어날 것입니다. (아이 신나네요~ 진짜 신납니다 아시죠?)
먼저 앞서간 많은 선배 개발자 분들이 친절하고 자세하게 도와주셔서 제가 무럭무럭 성장하고 있는 것처럼, 저도 언젠가 다른 분들에게 도움이 되는 날을 준비하고 있겠습니다 😉
끝으로
위에서 설명된 모든 코드는 Github에서 확인하실 수 있습니다! 일부 네이밍이나 코드 순서의 경우 글을 작성하며 다듬은게 있어 다를 수 있습니다.
fork로 가져가시거나 코드 자체를 다운로드 받으셔도 좋습니다!!
(혹시 더 좋은 방법이나 부족한 점이 있다면 따끔하게 꾸짖어주세요 혼나겠습니다 ㅋㅋㅋㅋㅋ)
만에 하나 해당 모듈을 프로젝트에 적용하시고자 한다면, jitpack으로 의존성을 받으실 수 있습니다.
긴~글 읽어주셔서 다시 한 번 감사드립니다 😄 항상 행복하세요~~